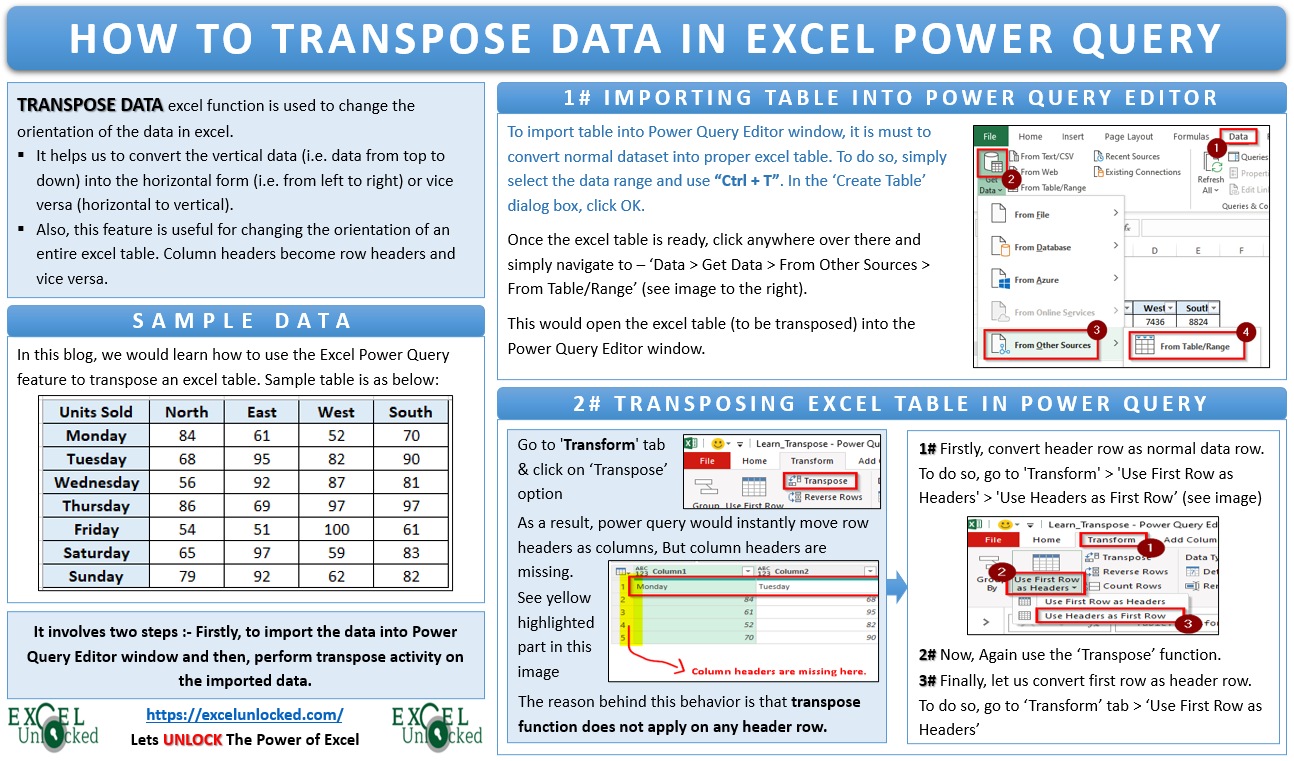
Transpose Data excel function is used to change the orientation of the data in excel. By changing the orientation, it means to convert the vertical data (i.e. data from top to down) into the horizontal form (i.e. from left to right) or vice versa (horizontal to vertical). Additionally, this feature is also useful for changing the orientation of an entire excel table, i.e. convert the column headers of an excel table into row headers and the row headers into column headers. In this tutorial, we would learn how to use the excel power query feature to transpose an excel table.
Readers also view Transpose Function in Excel blog to learn 2 advanced ways of transposing data in excel.
Sample Excel Table to Transpose Data
The below image shows the number of units sold by a company during a week in four regions.

Let us learn how to transpose this table using the Power Query Editor window.
2 Step Procedure to Transpose Data Using Power Query
The Excel Power Query feature is an amazing tool provided by Microsoft in newer versions of Excel. Are you using older Excel versions? Then check for the compatibility here.
For me, the Power Quer feature is like a lifesaver tool provided by Excel. The basic purpose of this feature is to import and get data from excel tables, ranges, and outside excel sources like Text files, JSON, PDFs, etc. into an Excel workbook. Also, you can transform the imported data as per your wish and need.
Transposing of excel table is one of the other transformations that the power query feature can do for you.
It involves two steps:
- Importing the excel table into the power query editor window
- Perform Transpose activity on this imported table
1# Importing Excel Table into Power Query Editor Window
In order to import an excel table/range into the power query editor window, it is important to understand that the power query editor window does not accept any normal dataset ranges. To use the power query editor window for range, the dataset needs to be in a proper excel understandable table format.
To convert a normal dataset into a proper excel format, select the table range, and follow this path – ‘Insert’ > ‘Tables’ group > ‘Table’ option (as shown below).

More details on Excel Table Format can be found in this link.
Now, once a proper excel table is ready, we can easily import this excel table into the power query editor window.
Click anywhere on the excel table that you want to import to the power query editor window and then go to Data > Get Data > From Other Sources > From Table/Range.

The excel table (to be transposed) is now in the Power Query Editor window, as shown in the image below.
Also Read: 2 Ways to Use Transpose Function in Excel


2# Transforming Table in Power Query Editor Window
The transformation of imported data is very easy when it comes to using Power Query data transformation options.
The Transpose option is available under the ‘Transform’ tab > ‘Table’ group.

If you click this icon, the power query editor window would instantly move the row headers as columns.
But did you notice that the ‘Transpose’ option did not move the column headers (North, East, West, South) as the row headers? Column headers are missing while transposing the table in Power Query.

The reason for this weird excel behavior is that the transpose function does not apply on any header row.
Follow the below steps to fix this issue.
- Under the ‘Applied Steps’ section of the Power Query Editor window, click on the ‘Delete’ icon just beside the step ‘Transposed Table’. This would delete the recently applied step and bring back the table in the power query to original.

- Now, make and convert the header row as a normal data row. To do so, go to ‘Transform’ > ‘Use First Row as Headers’ > ‘Use Headers as First Row’.

- This would instantly make the header row (North, East, West, South) the first data row of the table. See the image below:

- Now, again try to use the ‘Transpose’ option.
- Consequently, you would notice that both the column headers and row headers are now correctly transposed.

- Again convert the first row as the header row in the power query editor window. To do so, use the option ‘Use First Row as Headers’ (Transform Tab).


Finally, let us now quickly load this new transposed table back to the excel worksheet. Simply, go to the ‘Home’ tab and choose the option ‘Close & Load’.
This brings us to the end of this tutorial on ‘How to use Transpose Feature in Power Query in Excel’ 🙂