
Have you wondered how to convert the rows into columns and columns into rows in Excel? This is what is called the “Transpose” function in excel. There are 2 ways of using Transpose in Excel.
In this blog, we would unlock the ways to change the orientation of dataset.
What is Transpose Function in Excel?
The Transpose functionality of Excel helps to convert the table rows into a column and the column into rows.
Let me explain this with the help of sample data. Below is the sample data table containing row heading and column headings with some data inside it.

Now you wish to change the orientation of this table by making the row headings as a column heading and the column headings as the row heading.
Using Transpose Function in Excel
Select the entire table.

Press Ctrl + C on your keyboard.
Now select the cell where you want to paste this table in changed orientation. In the present case, I have selected cell F1.
Press Ctrl+Alt+V keys. The “Paste Special” dialog box would appear on your screen.
In this dialog box, click on the checkbox “Transpose”. And then click on the OK button to exit the screen.

As a result, you would notice that the orientation of the table changes. The row headings of the original table are now column headings and vice versa.

Using Transpose Formula in Excel
This is another method to transpose the table in excel. It is a formula based approach.
Let us take the same data set.
Select the exact number of cells as the original data at the location where you want to insert the transposed dataset.
In our example, as we want to transpose the table with 5 rows and 4 columns, therefore, we need to select 4 rows and 5 columns at the destination location.

Enter the formula =TRANSPOSE(A1:D5) in the active cell (The active cell should be the top-left cell of the selection. In our case, the active cell is F1 which is the top-left cell in the selected cell).

Now press Ctrl+Shift+Enter on your keyboard. (Do not press Enter Key)
As soon as you press the Ctrl+Shift+Enter, you would notice that your dataset is now transposed, as seen below:

As you can see from the above methods that in both cases, the cell value of the transposed dataset remains intact and static. This means that the transposed table doesn’t change it’s value automatically if any change is made in the original dataset table.
To make the transposed dataset table as dynamic, refer to the below section of this blog.
Dynamic Transpose Table [Bonus Trick for You]
In this section of the blog, we would learn how to make the transposed dataset table dynamic. Any changes in the original table will also change corresponding values in the transposed table.
Select the entire original table.
Now, copy the selected cells using Ctrl+C on your keyboard.
Click on the destination cell (where you want transposed data) and press Ctrl+Alt+V to open the “Paste Special” dialog box.
Click on the “Paste Link” button.

As a result, this new table has a links to the original data table.
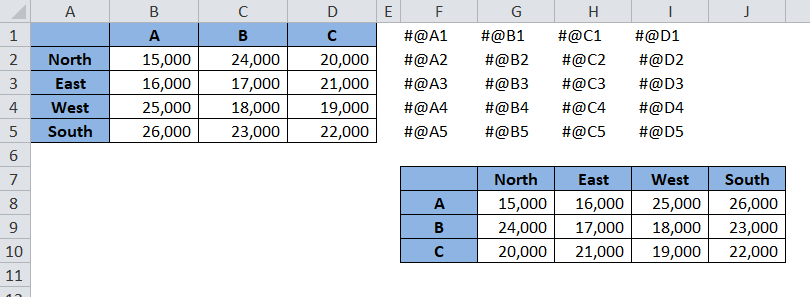
Now select this new table and press Ctrl+H to open the “Find and Replace” dialog box.
In the “Find What” section, enter equal to (=) sign. And, in the “Replace With” section, enter any combination of the symbols (I am using “#@” symbol, you may use any of your choices. But make sure that it is not part of your dataset).

Click on the “Replace All” button. This will replace the “=” with “#@” symbol in the formula link of the selected cells.

Now copy this entire new data table.
Select any other cell and press Ctrl + Alt +V on your keyboard to open the “Paste Special” dialog box.
Select the checkbox “Transpose” and press the “OK” button.
Consequently, the dataset gets transposed.
Select this third table and press Ctrl+H to open the “Find and Replace” dialog box. Now, replace “#@” with “=”.

Finally, you would have the formula link to the original table and the dataset table is transposed.
Done !!
Once the above steps are performed, change values in the first table. As a result, the excel automatically changes that particular cell value in the transposed table.
This brings us to the end of this blog. I hope you have learned a lot from this blog.