The Excel Power Query feature, popularly known as ‘Get & Transform’, is a life-saver tool used to extract and transform data from various sources into an excel workbook. This feature is available, by default, in Excel 2016, 2019, and Office 365 versions. The transformation of data in excel is carried out in a separate window called the ‘Power Query Editor’ window. One of the numerous transformations that power query can do, is ‘Adding custom columns in a table in power query excel‘.
In this tutorial, we would learn what is the purpose of custom columns and how to use a custom column in excel power query.
Which excel version are you using? Is it Microsoft Excel 2010 or Excel 2013?
If yes, then you must check this link before going through this tutorial.
What is the Purpose of Custom Columns in Power Query?
The custom column is a new column added to the excel table using power query, the value of which is derived using a custom formula that you specify.
The below excel table shows the number of units sold for the month of December-2020.
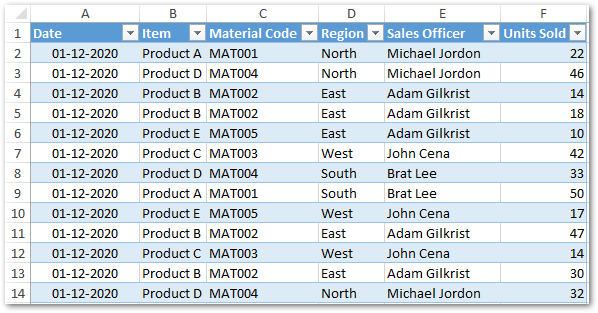
Suppose, we want to add a new column at the end of the table which calculates the total sales value. The total sales value should be calculated using this formula – [Units Sold] * $40 each.
2 Steps on How to Add Custom Column in Power Query
Adding custom column using power query in excel is a two step procedure:
- The first step is to pull the table data into the ‘Power Query Editor’ window.
- The next step is to add a custom column at the end of the table.
Let us go in detail of each of the above mentioned steps
Get Excel Table into Power Query Editor Window
To import the table or range of cells in power query editor window, follow the below steps:
- Select the data table range of cells.
- Now, navigate to Data tab > Get & Transform Data group > Get Data > From Other Sources > From Table/Range.
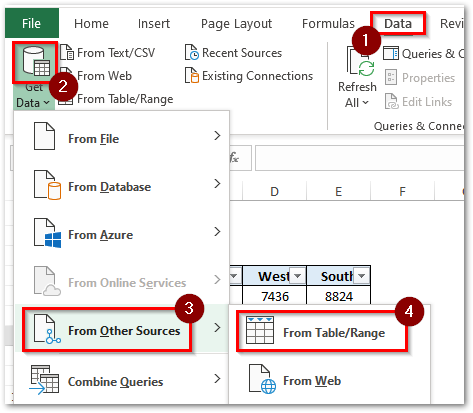
- In the ‘Create Table’ dialog box, verify the selected table range and click OK to accept.
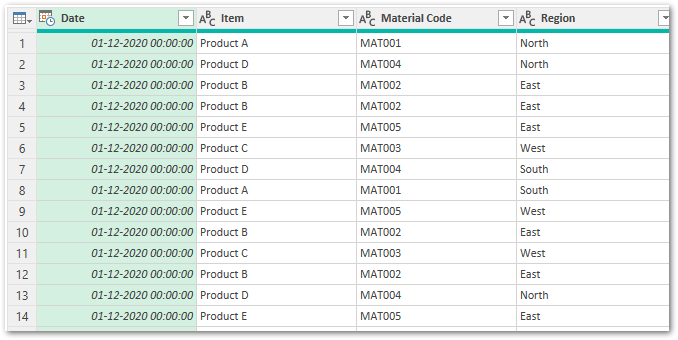
As a result, the excel creates an excel understandable table and will also open a new window named – ‘Power Query Editor’ would appear on your screen having this table data.
Add Custom Column at End of Table
You can find the ‘Custom Column’ transformation option under the tab – ‘Add Column’.
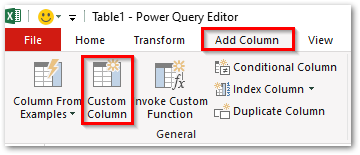
Follow the below steps to add and use a custom column at the end of the table in the power query editor window.
- Navigate to the ‘Add Column’ tab and choose the option ‘Custom Column’ (as shown in the above screenshot).
- As a result, the ‘Custom Column’ dialog box would appear on your screen.
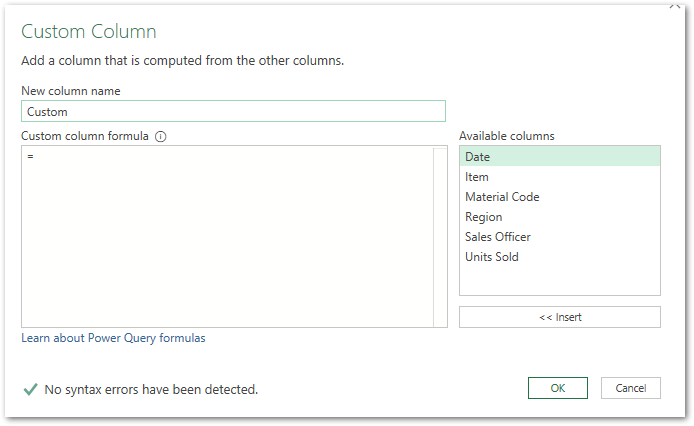
This dialog box has three sections –
- New Column Name section – Here you need to specify the new column header name of your choice.
- Custom Column Formula section is where you specify the calculation formula.
- Available Columns section – This section contains the table column, which you can use at the time of creating the formula.
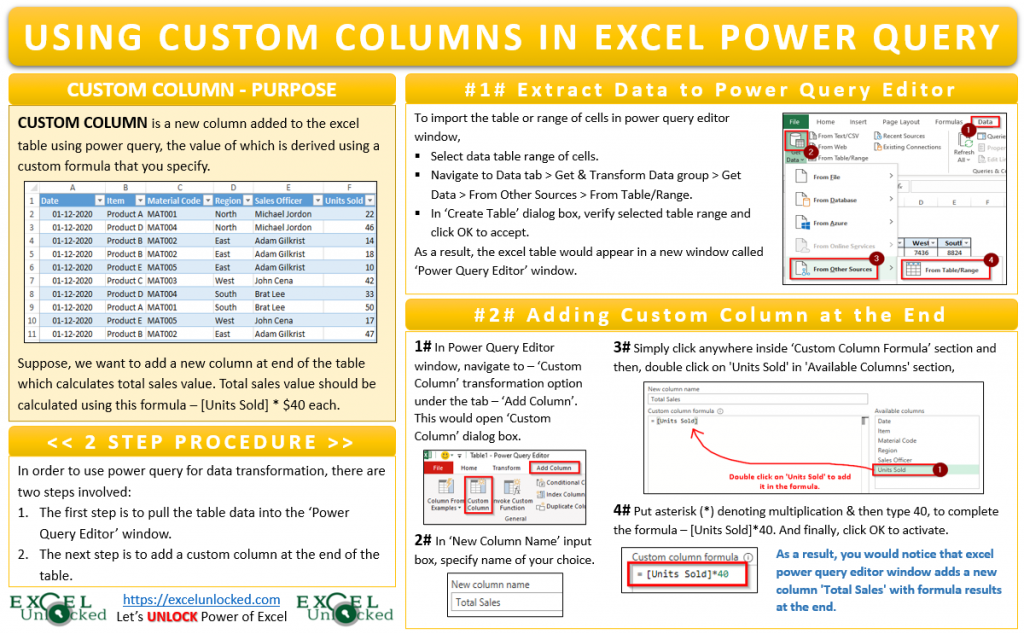
- In the ‘New Column Name’ input box, specify the name as ‘Total Sales’. As soon as you type a new name, there occurs a syntax error – ‘The formula is incomplete‘, at the bottom. This occurs when you have specified the name, but yet not specified the formula.
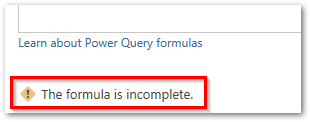
- Now, click anywhere inside the ‘Custom Column Formula’ section and double click on the column – ‘Units Sold’ in the ‘Available Columns’ section. As a result, this would instantly place the ‘Units Sold’ within a square bracket in the formula section.
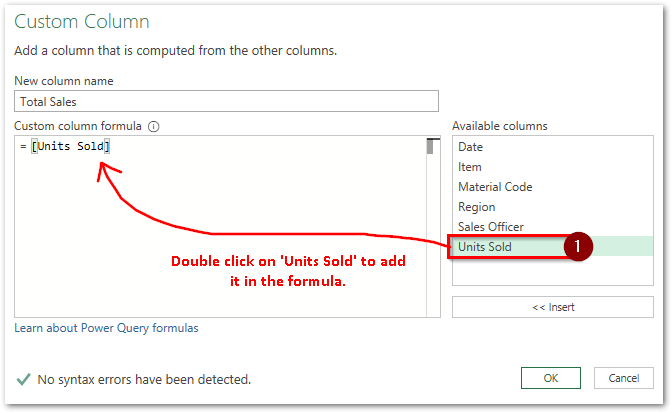
- Now, press the asterisk (*) key on your keyboard that denotes multiplication, and then type ’40’ to complete the formula – [Units Sold] * 40.
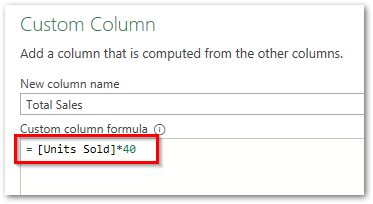
Finally, press OK to activate this formula.
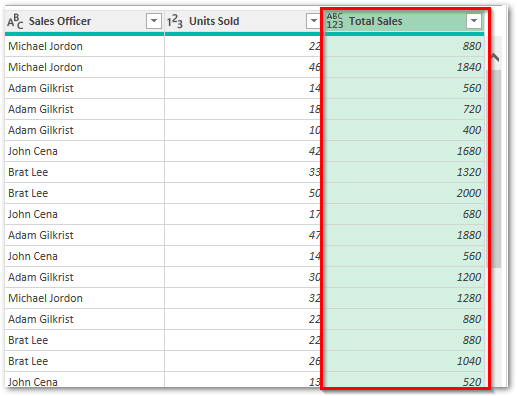
As a result, you would notice that power query adds a new column ‘Total Sales’ with formula results at the end, as shown below:
How to Get Data from Power Query Editor to Excel
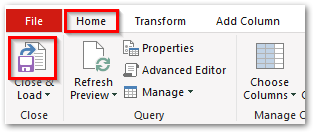
Finally, to export this new table with the new custom column, navigate to the ‘Home’ tab > ‘Close & Load’.
As a result, it would instantly create a connection and export the excel file from the power query editor window into excel.
Custom Column Examples in Power Query
The below table shows few more examples with explanation for creating custom column formulas in power query:
| # | Example | Result |
| 1 | “Power Query” | This would create a custom column with the text ‘Power Query’. |
| 2 | 14+14 | This would give the final result of the 14+14, which comes to 28 |
| 3 | “Mr.” & [Sales Officer] | This would create a custom column with the sales officer’s name prefixed by “Mr.” (e.g. – Mr. Michael Jordan) |
From the above table, following points come out as conclusion.
- The constant texts (like ‘Power Query’, and ‘Mr.’) should be typed within double inverted commas.
- Numbers (like 14, 28) should be typed as is (without any quotation marks and so).
- To use the values from existing columns, type the column header name within square brackets.
- Use an ampersand (&) symbol to concatenate texts or column values (example – “Mr.” & [Sales Officer])
- You can use the mathematical operators like ‘*’ (multiplication), ‘+’ (addition), ‘-‘ (subtration), and ‘/’ (division) to create custom formula.

