The ‘Power Query’, popularly known a ‘Get & Transform’, is an excellent tool pre-installed by Microsoft in its higher versions of excel (Excel 2016 and later). This feature allows excel users to import data from sources to an excel workbook. To name a few, you can get data from CSV, Notepad, JSON, website URL, and many other sources to excel. This feature also enables users to transform this imported data using various power query transformation tools. One of the many transformations that you can do using a power query is adding an index column in an excel table using the power query.
In this blog, we would learn how to add and use the index column feature in excel using power query.
What is Index Column?
Many times, when you get data from some webpage into excel or from other external sources, it does not have the row counters at the beginning of the table. The row numbers allow you to determine how many rows of data does your table contain.
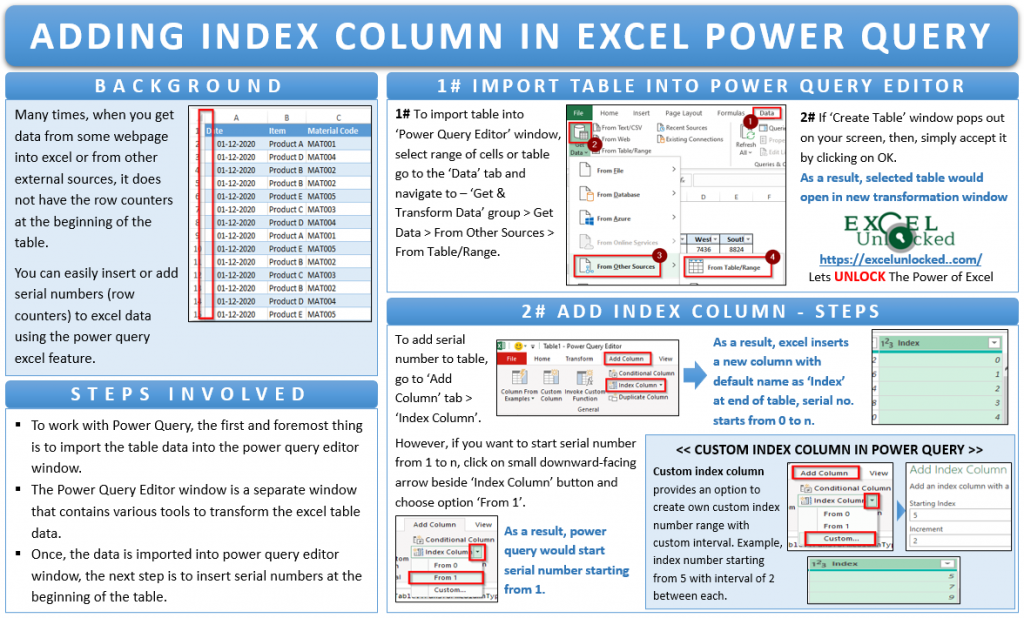
As shown in the image below, the row numbers are missing.
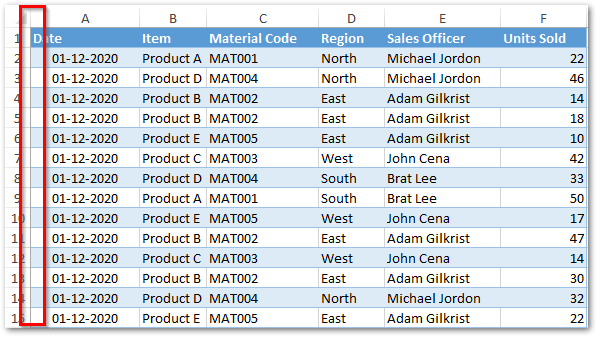
You can easily insert or add serial numbers (row counters) to excel data using the power query excel feature.
Steps To Add Serial Number (Index Column) using Power Query
To work with the excel power query feature, the first and foremost thing is to import the table data into the power query editor window.
The Power Query Editor window is a separate window that contains various tools to transform the excel table data.
Let us see how to import the excel table into this new transformation window (The Power Query Editor window).
1# Import Excel Table into Power Query Editor Window
- Select the range of cells or table to import.
- Then, go to the ‘Data’ tab and navigate to – ‘Get & Transform Data’ group > Get Data > From Other Sources > From Table/Range, as shown below:
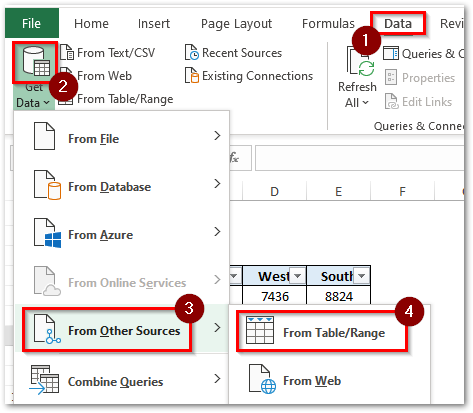
- If the ‘Create Table’ window pops out on the screen, then, simply accept it by clicking on OK.
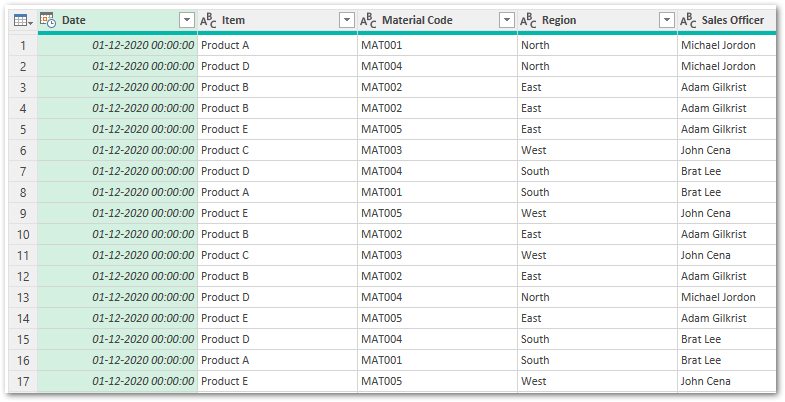
As a result, the selected table would open in the new transformation window, as shown below:
Do you have this question – My excel does not contain Power Query? If yes, then check excel power query compatibility here.
2# Using Index Column To Add Serial Number
Once the excel table is inside the power query editor window, we can use the ‘Index Column’ feature of Power Query to add serial numbers to the rows.
The Index Column transformation tool is available in the ‘Add Column’ tab (General group) as shown in the image below:
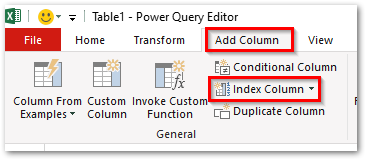
- Click on the ‘Index Column’ option and –
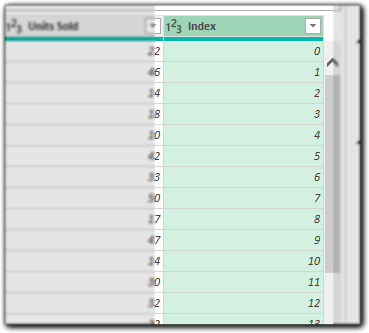
- Excel inserts a new column having the default name as ‘Index’ at the end of the table.
- The serial number starts from 0 to n (default option).
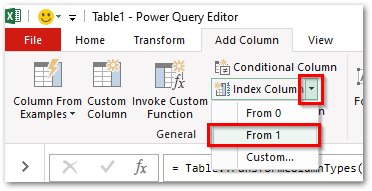
However, if you want to start the serial number from 1 to n (instead of 0 to n) in the power query editor window, click on the small downward-facing arrow beside the ‘Index Column’ button and choose the option ‘From 1’.
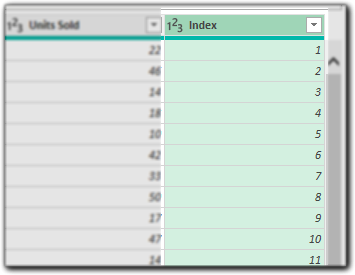
As a result, power query would start serial number starting from 1.
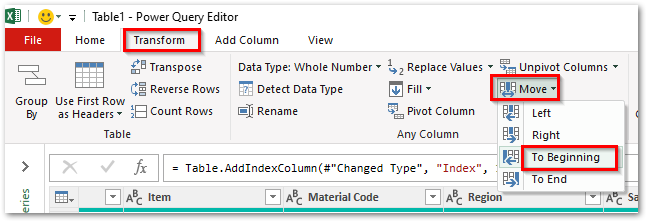
Let us now move the index column to the beginning or starting of the table.
To do so, you can either select, drag and drop the column or navigate to Transform > Move > To Beginning, as shown below.
Also Read: Custom Columns in Table in Excel Power Query
As a result, the index column would move to the beginning of the table.
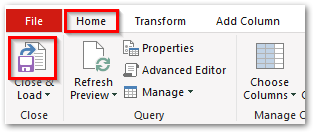
Let us finally export the transformed table from the power query window to the excel worksheet back. Use the path – ‘Home’ tab > ‘Close & Load’ option to achieve this.
Purpose of Power Query Custom Index Column
In the above sections, we have learned how to insert serial numbers starting from 0 or 1 in an excel table using a power query.
In addition to this, the power query editor window also provides the option to create your own custom index number range with a custom interval.
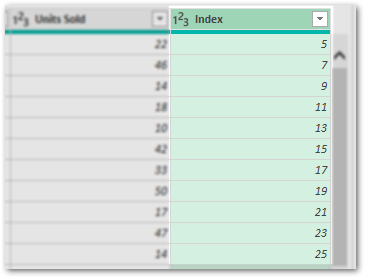
For example, let us create an index number starting from 5 with interval of 2 numbers between each.
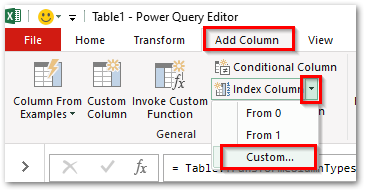
To achieve this, navigate to ‘Add Column’ > ‘Index Column’ > ‘Custom’ option as shown below:
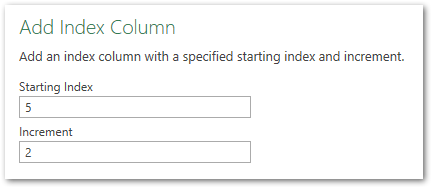
As a result, the ‘Add Index Column’ dialog box would appear on your screen, as shown below:
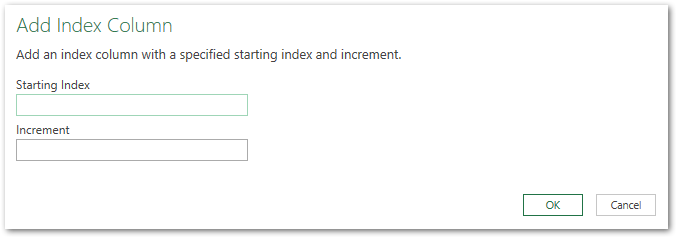
This dialog box has two input boxes:
- Starting Index – Enter the starting number for the serial number. In our case, the start number is ‘5’.
- Increment – Specify the interval between two serial numbers. In our illustration, it is ‘2’.
As soon as you click on the OK, you would notice that the power query adds a new index column starting from 5 and incremented by 2 (i.e. 7, 9, 11, and so on).
With this we have reached to the end of this blog on ‘How to add serial number column using excel power query’. 🙂
RELATED POSTS
- How to Import Data from Text File or Notepad to Excel
- Transpose Data in Excel Using Excel Power Query
- How to Filter and Sort Data in Excel Power Query
- Install Power Query in Excel 2010 [Step by Step Guide]
- How to Unpivot Data in Excel Using Power Query
- Import Data from Web To Excel Using Power Query

