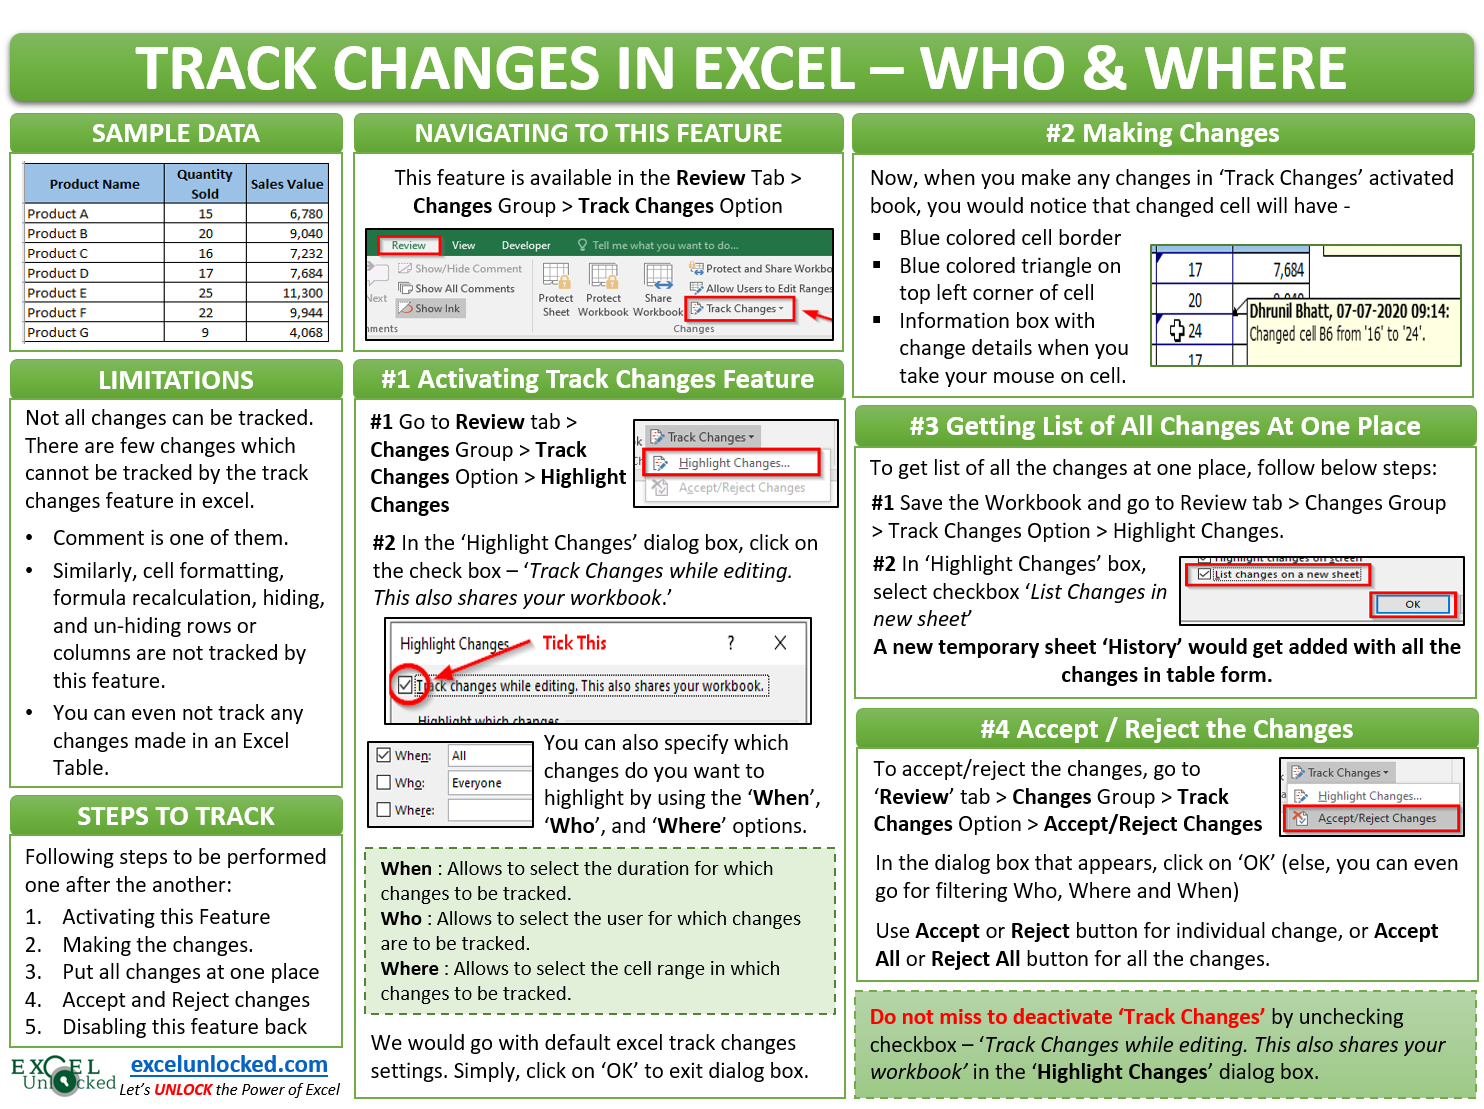
Suppose you are working with a shared workbook. One fine day when you open your excel workbook and you are astonished to see that there are many changes in the cell values, that you have not made, nor you intend to have those incorrect values in the cell. You would definitely like to know who has made these changes. This is what Track Changes feature in Excel would be a helping hand for you.
In this blog, we would unlock on how to enable, use and disable ‘Track Changes’ feature in Excel.
Sample Data
Below is the sample data set that we are going to use through out this blog under understand this useful technique.
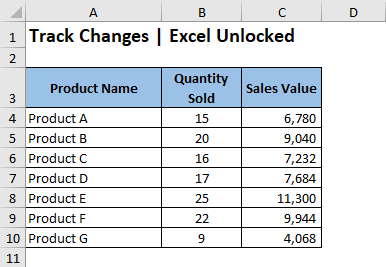
Before moving further, download the sample file using the ‘Download’ button below, and practice as you read.
Track Changes Feature in Excel follows a series of steps that need to be performed one after the other.
- The first step is to turn on the ‘Track Changes’ feature.
- The next step is to make changes.
- Then the next step is to have all the changes listed in one place.
- Next, you have to either accept the changes or reject them.
- Lastly, do not forget to disable this feature back.
Where is This Feature
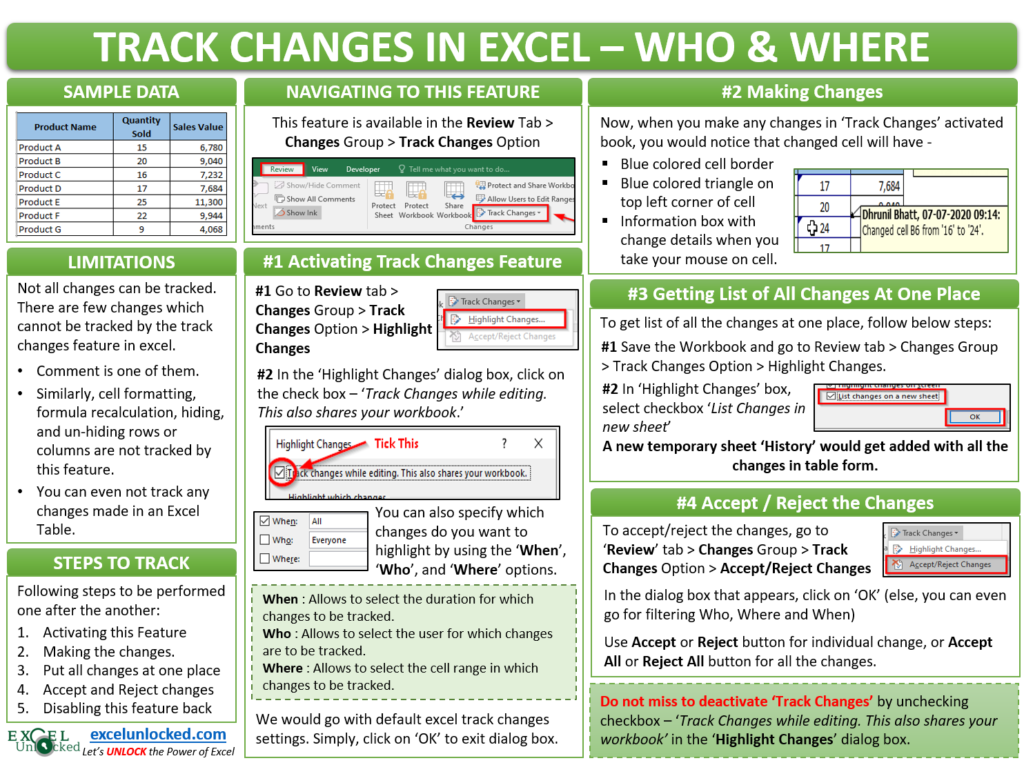
The track changes feature is available under the ribbon options in Excel. Below is the path to navigate to this feature:
Go to the ‘Review‘ tab in the Ribbon > Under the Group – ‘Changes‘, you can find the option that says – ‘Track Changes‘ as highlighted below:

How to Activate Track Changes Feature
The track changes feature is not activated by default in any new workbook. To enable or turn on the track changes feature in Excel, follow the undermentioned procedure:
Navigate to this option under the Review tab, click on the ‘Track Changes‘ option and select the option – ‘Highlight Changes‘.

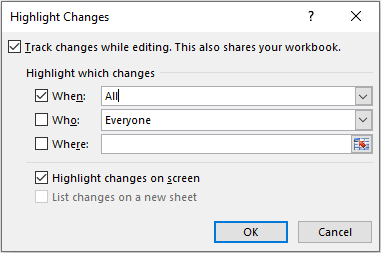
As a result, the ‘Highlight Changes‘ dialog box would appear on your screen with only one checkbox in it. Tick that checkbox to activate other options (shown below).
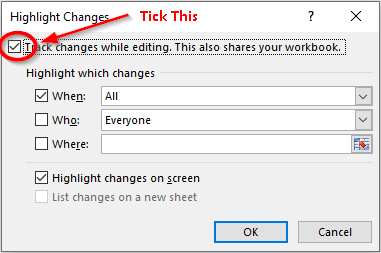
You can also specify which changes you want excel to highlight for you, by using the ‘When‘, ‘Who‘, and ‘Where‘ checkboxes and drop-down options.
Also Read: How to Lock and Protect the Cells in Excel
- When – The ‘When’ checkbox allows you to select the duration for which you want to track for the changes. By default its ‘All’, which means all the changes which are made henceforth are tracked. Other options are – Since I Last Saved, Not Yet Reviewed, and Since Date (to specify a particular date)
- Who – This checkbox allows you to select the user for whom you wish to track changes. By default, it is ‘Everyone’. Another option is – Everyone but me.
- Where – The Where checkbox allows you to specify the cell range for which you wish to track the changes. By default this is not active, meaning entire workbook.
In this blog, we would lets not change the default excel settings viz. the one shown below:
Finally, as soon as you click on the ‘OK’ button, there are two possibilities –
- If your workbook is a new book and is not yet saved in the system or drive, the excel would firstly open the ‘Save As’ dialog box and you need to save the workbook.
- If your excel workbook is already saved in the system, still excel would prompt you to save it. (no Save As dialog box).
Let Us Try To Make Some Changes
Now, the Track Changes feature is active in your workbook. Let us do some small changes and check how this functionality work.
I am making following changes in my sample data.
- Adding one new row (Product H) with quantity and sales value.
- Changing the quantity sold for Products A, C, and E
- Adding Total of the Sales Value
- Let me also add a comment to the header ‘Sales Values’
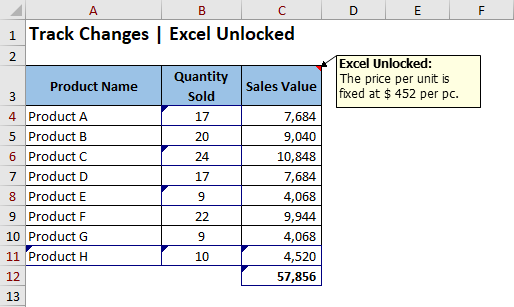
In the above image, you can see that the cells in which changes are made get a blue border around it with a small blue colored triangle on its top-left corner.
Now, when you hover your mouse over the cells, an information box would appear stating the details about the changes.
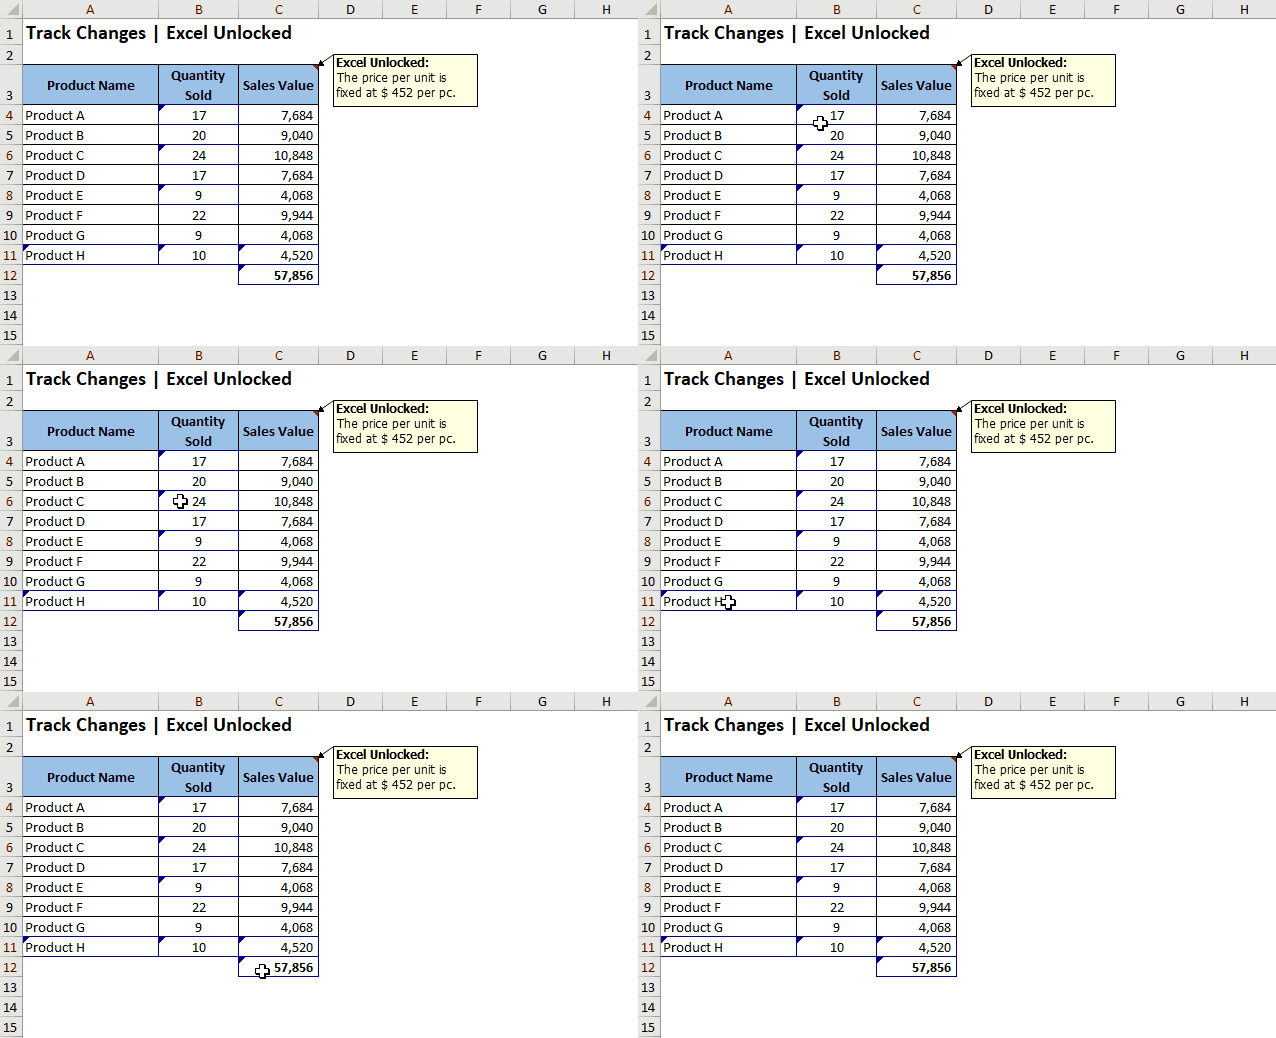
Track Changes Does Not Work
There are many changes which the ‘Track Changes’ feature cannot track. Excel Comment is one of them. Similarly, cell formatting, formula recalculation, hiding, and unhiding rows or columns are not tracked by this feature. You can even not track any changes made in an Excel Table. For that, you need to first convert an excel table into a simple range (Select cell in Table > Design Tab > Convert to Number).
Get All Excel Changes in One Place
Follow the simple procedure defined below to get the list of all the changes in the excel worksheet at one place:
Get List of All Changes in Excel At One Place
- Save Workbook
In order to generate the list of changes in Excel, firstly you need to save the excel workbook (Ctrl + S).
- Navigate to Highlight Changes
Once saved, go to the ‘Review’ tab > ‘Changes’ group > ‘Track Changes’ option > ‘Highlight Changes’ option.

- Checkbox Selection
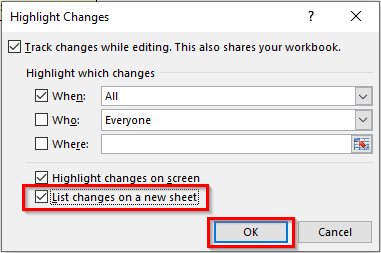
Finally, tick on the checkbox that says – ‘List Changes on a New Sheet’ and click on the ‘OK’ button as shown in the image-

As soon as you click on the ‘OK’ button, a new worksheet would open beside the existing worksheet with the sheet name as ‘History’. It would contain the list of all the changes made in a tabular form with details like date, time, changed by, old value, new value, etc. See the image below:

This sheet is a temporary one. Once, you save or close the workbook, the ‘History‘ sheet would go away.
Accept and Reject Changes – Track Changes in Excel
Once you have identified and reviewed the changes, the next step is to either accept those changes or reject them. If you accept them, excel would keep the accepted changes. On rejection, excel would revert the changes to the original.
Follow the below steps for accepting or rejecting the changes:
Under the ribbon options, go to the ‘Review‘ tab, click on the ‘Track Changes‘ option, and select the option that says – ‘Accept/Reject Changes‘.

As a result, the ‘Select Changes to Accept or Reject’ dialog box would appear on your screen, as shown in the image below:
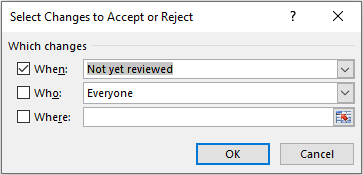
From here, you can filter upon the changes that you want to accept/reject based upon-
- When – When enables you to select which all changes should be taken into consideration. There are two options over here viz. Changes which are not yet reviewed and changes since a particular date.
- Who – This checkbox and drop-down allow you to select the user whose changes you wish to accept or reject.
- Where – Where option allows you to select the range of specific cells for which acceptance or rejection is to be made.
Let us go with the default setting (as shown in the image above) by clicking on the ‘OK’ button.
As a result, another popup would appear from where you can accept/reject specific change(s) or all the changes at one.
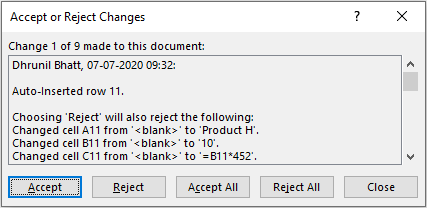
Use Accept or Reject button to accept/reject individual change, or Accept All or Reject All button to accept/reject all the changes.
The changes which you reject will revert to the original value and the changes that you accept will stay as it is. But keep in mind that you cannot undo the acceptance back.
Disable or Deactivate Track Changes Feature in Excel
Once you accept or reject the changes (as the case may be), make sure to disable or turn off the track changes feature.
Important – Once you disable the Track Changes feature, excel deletes the history permanently and you cannot retrieve it back. So, if you wish to save the history, copy the ‘History’ sheet that appears at some other worksheets for your future reference.
Navigate to this option under the Review tab, click on the ‘Track Changes‘ and select the option – ‘Highlight Changes‘.
In the dialog box that appears, simply uncheck the checkbox shown below, and click on the ‘OK’ button.
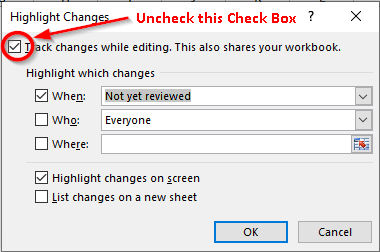
Another information message box would appear on your screen, simply accept it by clicking on the ‘Yes’ button.

In a nutshell, the above message box says that on clicking on ‘Yes’, the workbook would be removed from shared mode and other users who are editing this workbook currently would not be able to save their changes.
With this, we are reached to the end of this blog. Share your views, comment and opinion on in the comment box below.

