Many a time, while working with an Excel worksheet, you may do one or more tasks repeatedly each time you open a new worksheet. For Example, firstly, you zoom the worksheet area to 120%, then you click on the cell A1 and make a border to it, change the font size to 20, make it bold and italics and finally, change the cell background color to yellow. It will be a very monotonous task if you have to do this each time you open a new worksheet. How would it be if all this gets automated? The record and run the Macro feature in Excel is very useful. In this blog, we would learn how to record a macro and run it to automate the tasks which are performed repeatedly.
Excel has also provided functionality to assign a keyboard shortcut to the macro so that just at a press of keyboard combinations, the automated tasks get performed. Isn’t it amazing!
Some Basics About Excel Macro
Macros in Excel are nothing but a bunch of codes that are either written in the Excel VBA code window or are recorded manually, letting the excel write the code automatically based on the recording. The Excel record macro feature is very useful to those who do not know VBA coding.
When you record a macro, you perform the series of steps that you want to automate, and the excel closely monitors it, records it, and stores it so that it can be run in the future. This is what we are going to learn in the coming sections of this blog.
Also Read: Four Ways to Run A Macro in Excel
The Record Macro feature in Excel can record the following:
- Cell selections and key presses
- Cell Formatting (like Font size and format, cell color, borders etc.)
- Worksheet – Adding a new, deleting the existing, renaming
- Workbook – Opening and saving
- Editing a formula
And many such more actions …
Where is the Macro Feature in Excel
By default, the macro feature is not available in any new Excel workbook. In order to enable it and get the macro feature, you need to enable the ‘Developer’ tab in Excel.
To enable the Developer Tab, follow the following steps:
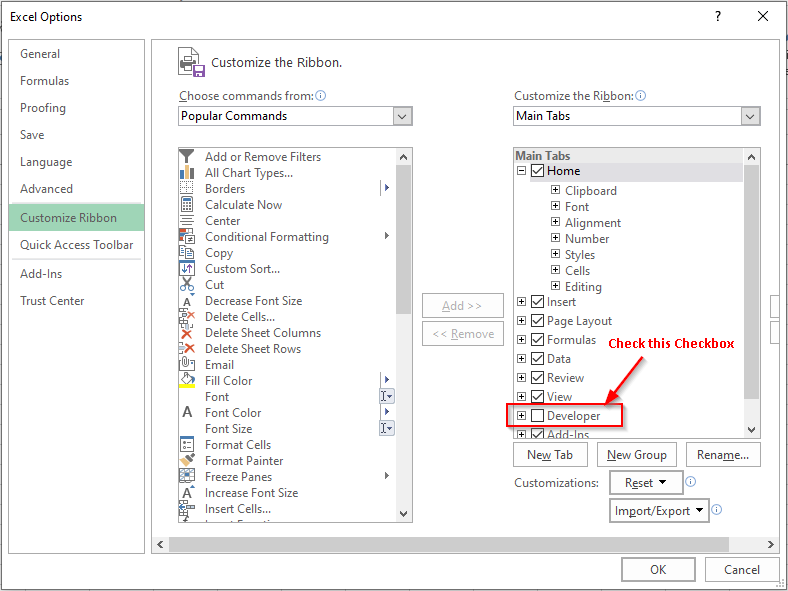
Right-click on any of the ribbon tab (Home, Insert or any other) and click on the ‘Customize the Ribbon’ option to open the ‘Excel Options’ dialog box.

On the options on the right of this dialog box, you would find a checkbox ‘Developer’ which is by default untick.
Just tick on this checkbox and click ‘OK’ to exit.
As a result, the ‘Developer’ tab would appear on the ribbon. Refer to the screenshot below:

Now, click on this tab and the first group that you would see is the ‘Code’ group. The code group consists of all the options related to Macro.
Also Read: 19 Everyday Use Excel VBA Codes

Caution – While You Record a Macro
Now when we have the developer tab in our worksheet, we are now good to record the macro in Excel.
Before, starting the recording, just to repeat what I mentioned before, the excel macro feature records all the activities that you perform while recording. Even if you press Ctrl+Z, it would record the undo action and will perform it when it is actually run.
So make sure that you do not perform any other unnecessary tasks while the macro recording is on.
Understanding ‘Record Macro’ dialog box
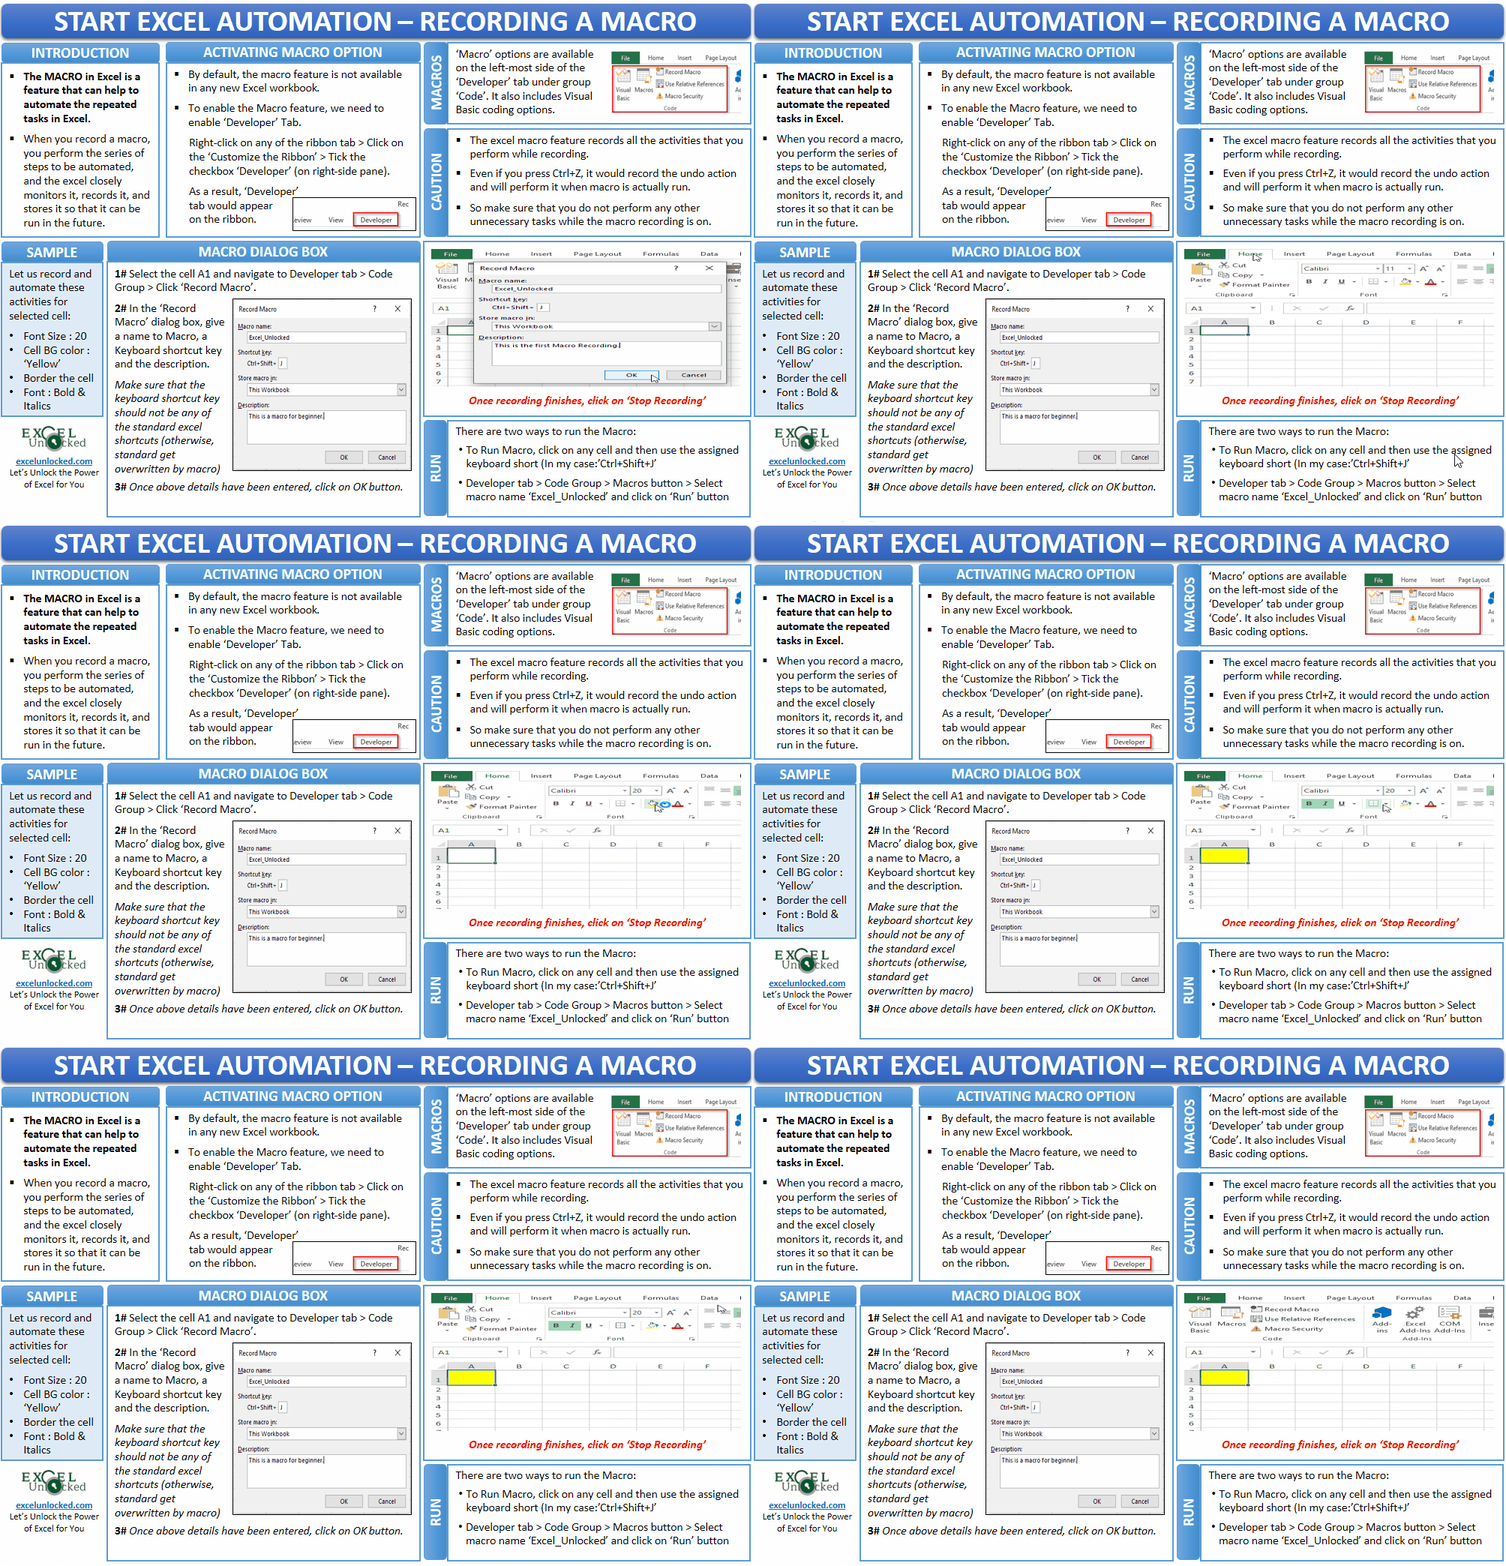
Before recording the macro, we need to decide on what tasks are to be automated. Let us make a border to a cell, change its font size to 20, make it bold and italics and finally, change the cell background color to yellow.
To record a macro, follow the below steps:
Under the ‘Developer’ tab, click on the option named ‘Record Macro’ to open the ‘Record Macro’ dialog box.

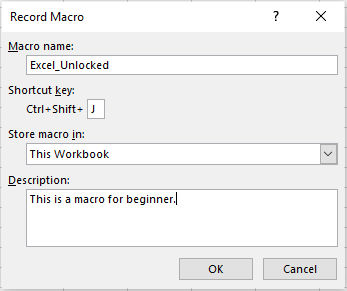
Give a name to your Macro in the input box ‘Macro name’. This field does not accept space characters.
The ‘Shortcut Key’ input box is optional. If you wish to give a keyboard shortcut, then you can use this option. Make sure that the keyboard shortcut that you choose should not be any from the pre-defined excel shortcuts (like Ctrl+C, Ctrl+V, etc.), otherwise, the shortcut you choose for macro would override the pre-defined excel shortcuts. For example, if you give Ctrl+C as a macro keyboard shortcut, then excel would not copy the cell when you press Ctrl+C but would run the macro.
I have entered Ctrl+J (in upper case). When you enter any character in the upper case, the excel would automatically add the ‘Shift’ key as well. The keyboard shortcut would then be ‘Ctrl+Shift+J’.
The ‘Store Macro In’ section allows you to choose where do you want your macro to work. Choose the ‘This Workbook’ option, so that it works each time when you open and reopen the worksheet.
The ‘Description‘ input box is just for information (if you wish to give a detailed note on macro).
Record Macro in Excel – Start Automation
Once you have decided with your macro name, attached a keyboard shortcut key to it, and have given a description to your macro, click on the OK button.
As soon as you click on the OK button, the macro recording gets started. You can see the ‘Stop Recording’ button (earlier it was ‘Record Macro’ button) which means that the recording has started.

Even you can see the stop button at the bottom of the worksheet.

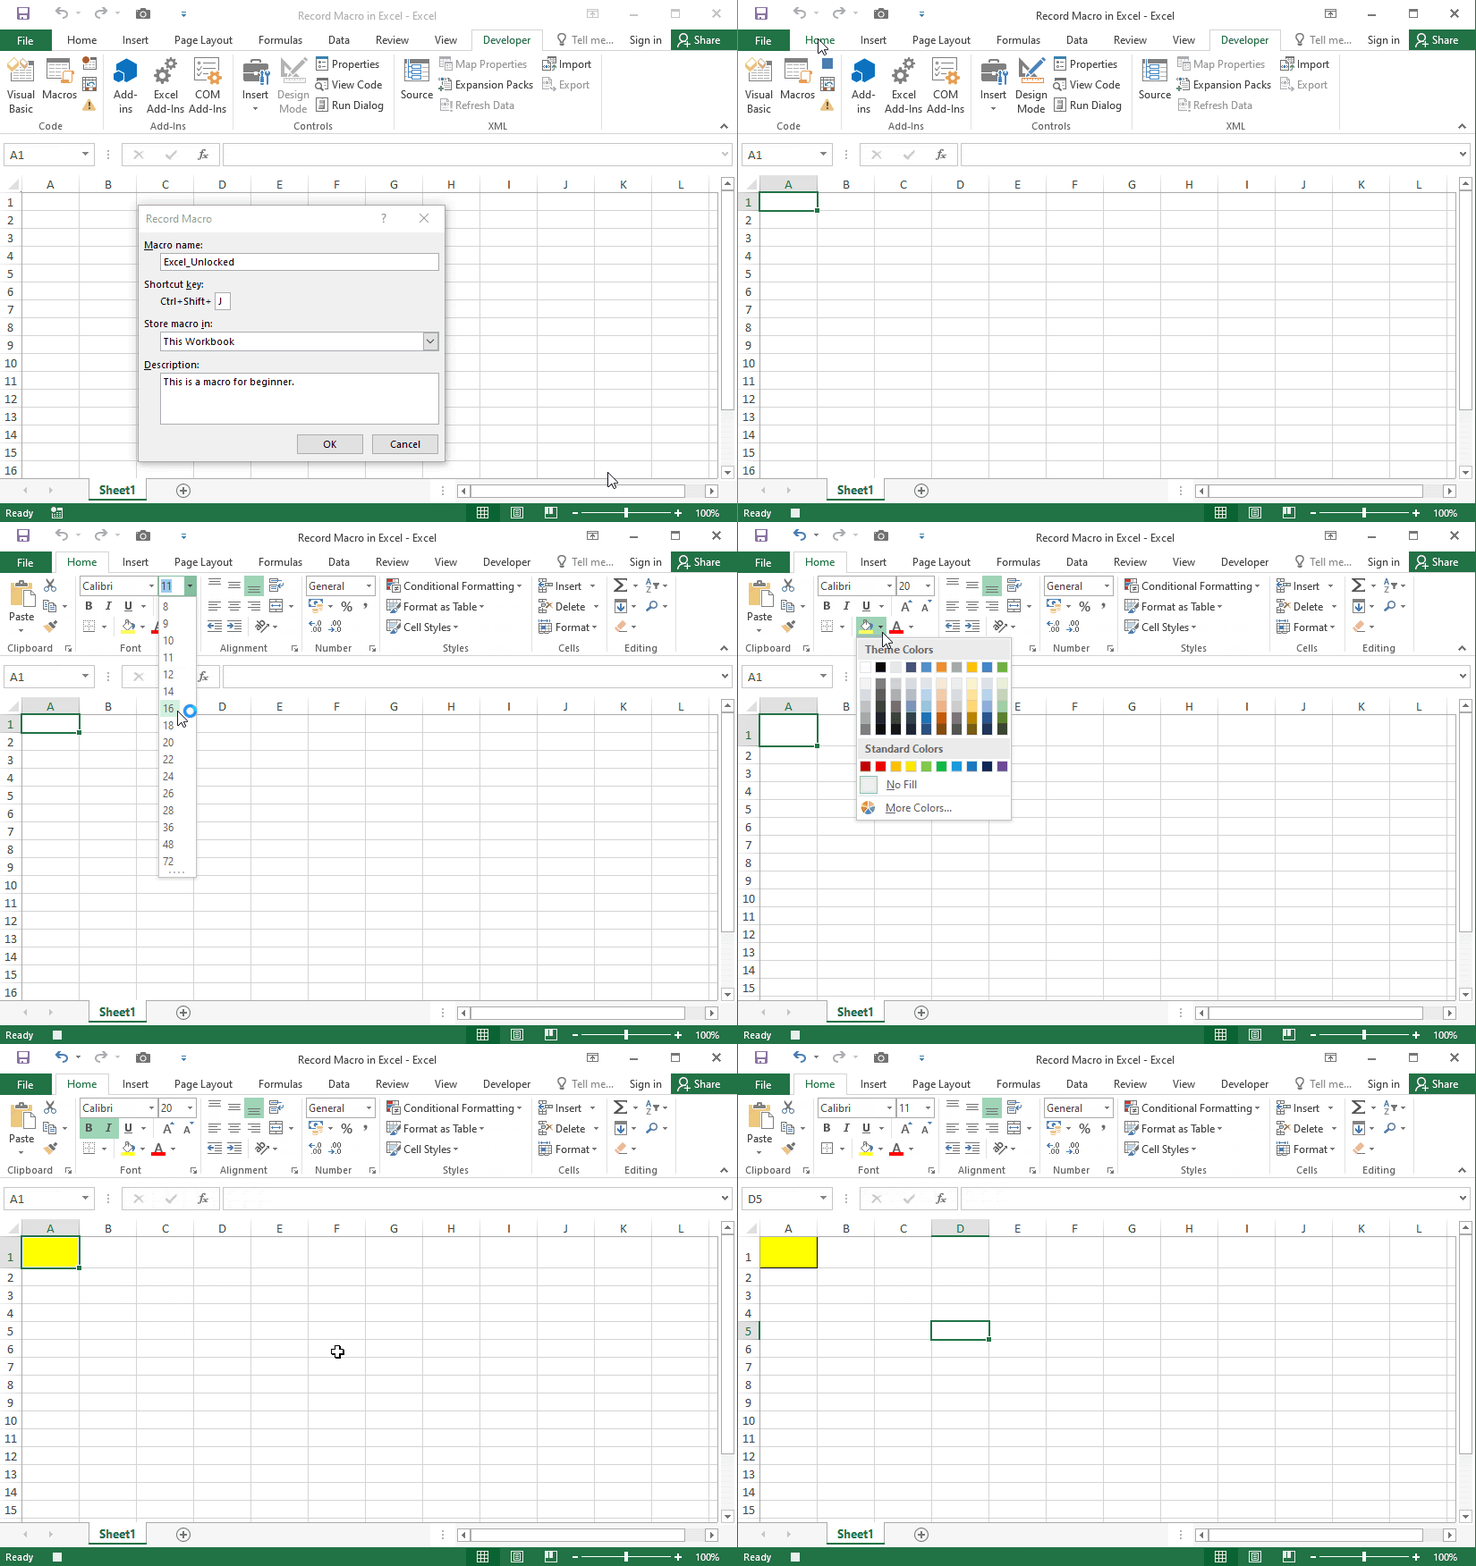
Let us now record our steps. Give a border, change the font size to 20, make it bold and italics and then, give background color as yellow.
Below is a demonstration for you.
As soon as you complete the above recording, click on the ‘Stop Recording’ button.

This completes our recording. Let us now test our macro.
Run Macro in Excel
There are two ways to run a macro in excel. One is by using the keyboard shortcut that you had assigned to your macro and the other is by using the ‘Record Macro’ dialog box.
Let us first use our assigned keyboard shortcut.
Select the cell where you want to perform the automated steps and just press Ctrl+Shift+J (our macro shortcut key combination).
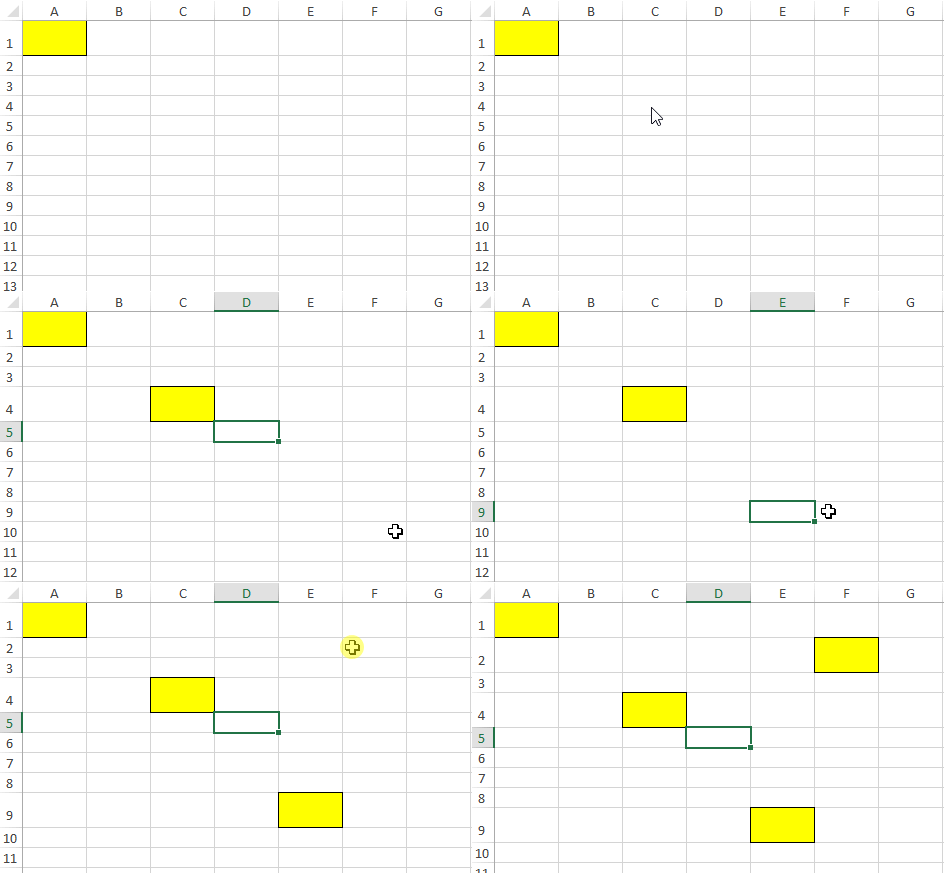
You would notice that the Excel performs all the actions and applies the formatting to the selected cell accordingly.
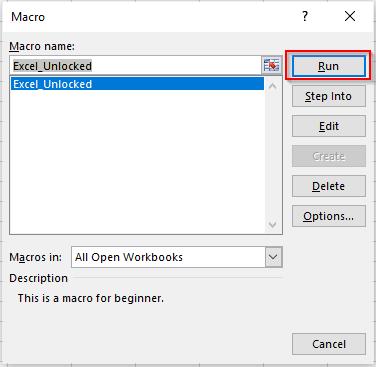
Another way is to use the ‘Run’ button in the ‘Run Macro’ dialog box. To use this option, click on the cell. Go to the tab ‘Developer’, under group ‘Code’, click on the ‘Macros’ button. (Or use Keyboard Shortcut – Alt+8).

The ‘Macros’ dialog box would pop out on your screen where you would find the recorded macro ‘Excel_Unlocked’. If there are more than one macros, they would appear here.
Select the ‘Excel_Unlocked’ macro and click on the ‘Run’ button to run it.
I have, for my daily office purpose, created a standard macro for all the table heading, which performs the following actions. It aligns the selected text to the center and middle of the cell. Then it applies the bold formatting to it and finally, gives a ‘Grey’ background color to the selected cell.
Assigning A Button to Macro
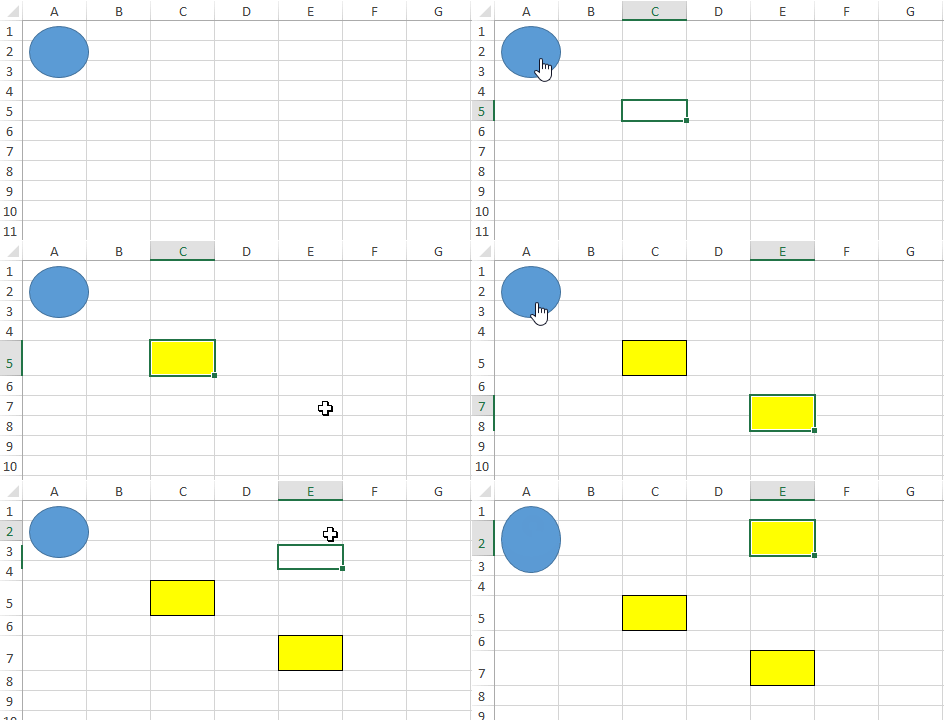
How would it be if you have a button in your worksheet and when you press that button the excel runs the macro and performs all those tasks automatically, which you have otherwise run by using the assigned keyboard shortcut or by using Macro dialog box.
We can achieve this by assigning the macro to a button.
Firstly, insert a shape and place it at a preferred location on your worksheet. (Insert tab > Illustrations group > Shapes).

Then, right-click on the inserted shape and click on the option ‘Assign Macro’.

In the ‘Assign Macro’ dialog box that appears, you would find the list of macros that are at present recorded in this workbook. Click on the macro name (I have only one – Excel_Unlocked) and then click ‘OK’ to complete the assignment.

Now, take your mouse cursor to the shape, and you would notice that the pointer converts to a hand like a symbol.

Now as soon as you click on this shape, you would notice that excel runs the assigned macro.
Where Does Excel Store This Recording?
To see where the excel store your recording, navigate to the ‘Developer’ tab. Under the ‘Code’ group, you would notice an option called ‘Visual Basic’. Click on it and another window would appear named ‘Visual Basic Application’. This is the place where you can create a new macro VBA code and see the existing one.

Let us see some basic things about this window and written VBA code.
Double click on the ‘Module 1’ option (as highlighted in the screenshot below) and a window would appear on the right.
There you would find a piece of code and this is what happened in the backend when you had recorded the macro.
Excel wrote a VBA code by itself.

The code starts with the ‘Macro Name’ prefixed by Sub (meaning Subroutine) and suffixed by parentheses – Sub Excel_Unlocked(). You can change the name of the macro from here itself. Just delete the name ‘Excel_Unlocked’ and give another name to it.
In the following code lines, you can see the Macro description and the assigned keyboard shortcut.

All these code lines which have an apostrophe (‘) sign before it, are not a part of code execution. They are just comments about giving a piece of information. They are not read and executed at the time when macro is run.
Every code line without an apostrophe before it is what is being read and executed.

Saving Macro-Enabled Workbooks
Whenever you save any standard Excel workbook, the excel saves it in .xslx of .xls format on the basis of the version.
Similarly, the excel saves a workbook as a macro-enabled one in .xlsm format (‘m’ here stands for macro-enabled).
When you press Ctrl+S on your keyboard for the workbook which has a recorded macro, the excel would pop out a window giving the information that there are macros in this workbook.

Click on ‘OK’ to save the file as a macro-enabled one. Navigate to the folder to which you want to save your file. Make sure that you select the ‘Save as Type’ as ‘Excel Macro-Enabled Workbook’, as shown in the screenshot below.

Once you save the workbook, you would notice that the file icon would have an exclamation mark (!) on its bottom right corner.

This brings us to the end of this blog. Share your views and comment in the comment section below.
