You may have added “Comments” in Excel. However, it is not just limited to adding a new comment. Fortunately, you can do many more exciting things with “Comments” in Excel.
In this blog, we would unlock all the things that you can do with the “Comment” functionality of Excel.
- What is an Excel “Comments” Functionality?
- How to Add a New “Comment” to Cell in Excel?
- Show or Hide “Comments” in Excel
- Copy and Paste “Comments“
- Show/Hide All the “Comments” at One Go
- Reposition and Resize the “Comments“
- Change Background Color “Comment” in Excel
- Aligning the Text in Comment Box
- How to Print Excel Comments?
- Changing the Font Settings of Comment
What is an Excel “Comments” Functionality?
The Excel “Comments” gives us information about a particular cell. It means, comments are added to the cell and it gives additional feedback about the cell.
For example, if you are working with an important Excel Worksheet and you want that whose so ever opens this excel, later on, should know what does the content in a particular cell depicts. In that case, you can (amongst many other options) insert a new comment so that the new user can read the comment and understand the purpose of a particular cell.
How to Add a New “Comment” to Cell in Excel?
To add a new comment to an Excel Cell, follow the below procedure.
1. Select the cell to which you want to add a new comment.
2. In the ribbon bar, click on the tab “Review”. Under the “Comment” group, click on the option “New Comment”.
Also Read: How to Add and Delete a Comment in Excel

You would notice that Excel inserts a comment box for the cell.
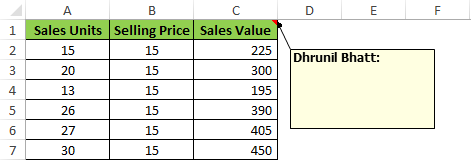
You can type anything of your choice in this comment box and it would remain saved.
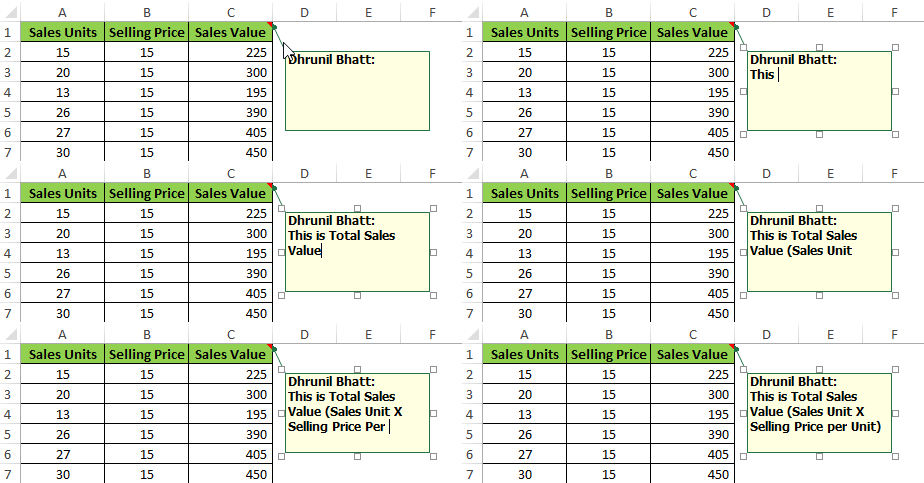
Show or Hide “Comments” in Excel
As soon as you enter any text in the comment box and click on any of the cells in Excel, you would notice that the comment would disappear. Don’t be worried. It has just got hidden. It is still available in Excel Cell.
As a result, a “Red” mark on the top-right of the Excel cell. This shows that this cell contains a comment (which is not visible at the moment).

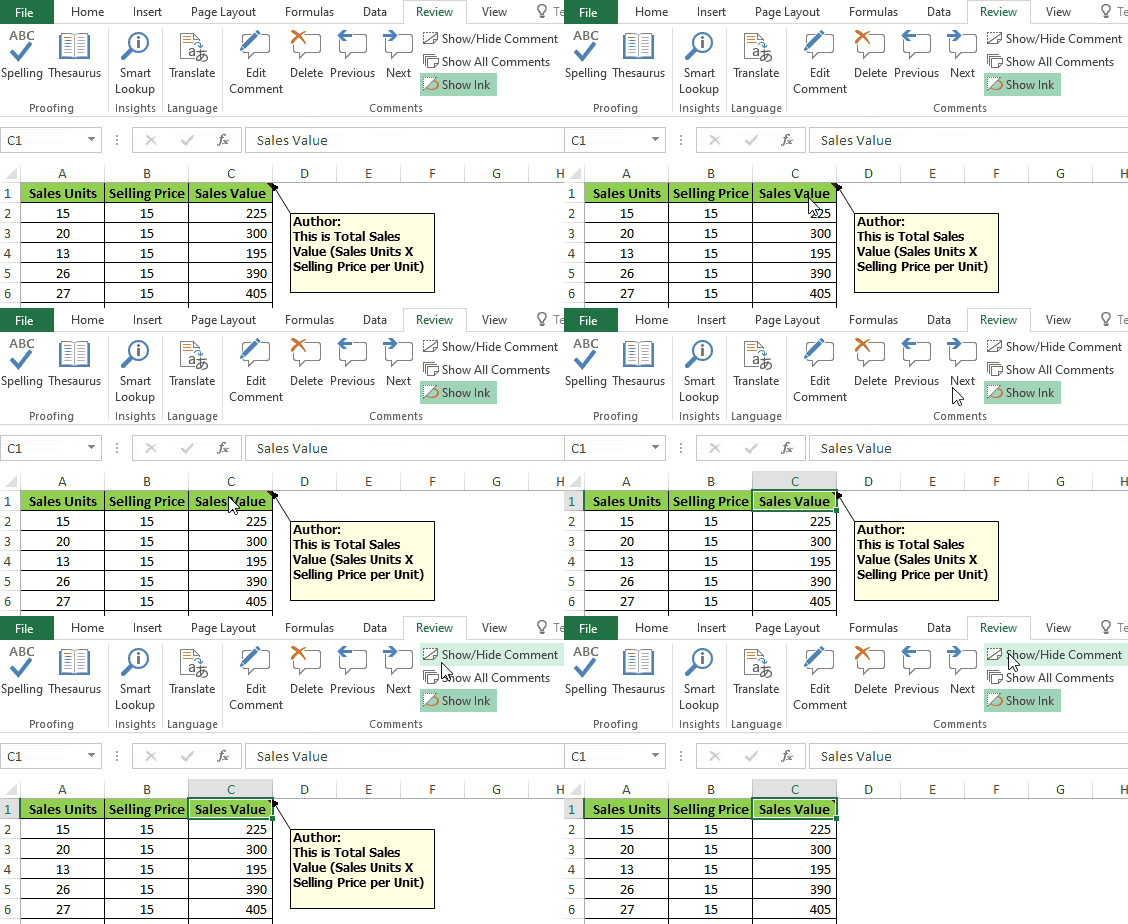
To show the comment, select the cell. click on the tab – “Review” . Under the “Comment” group, click on the button “Show/Hide Comment”.
The comment is now visible (as you can see from the image below)
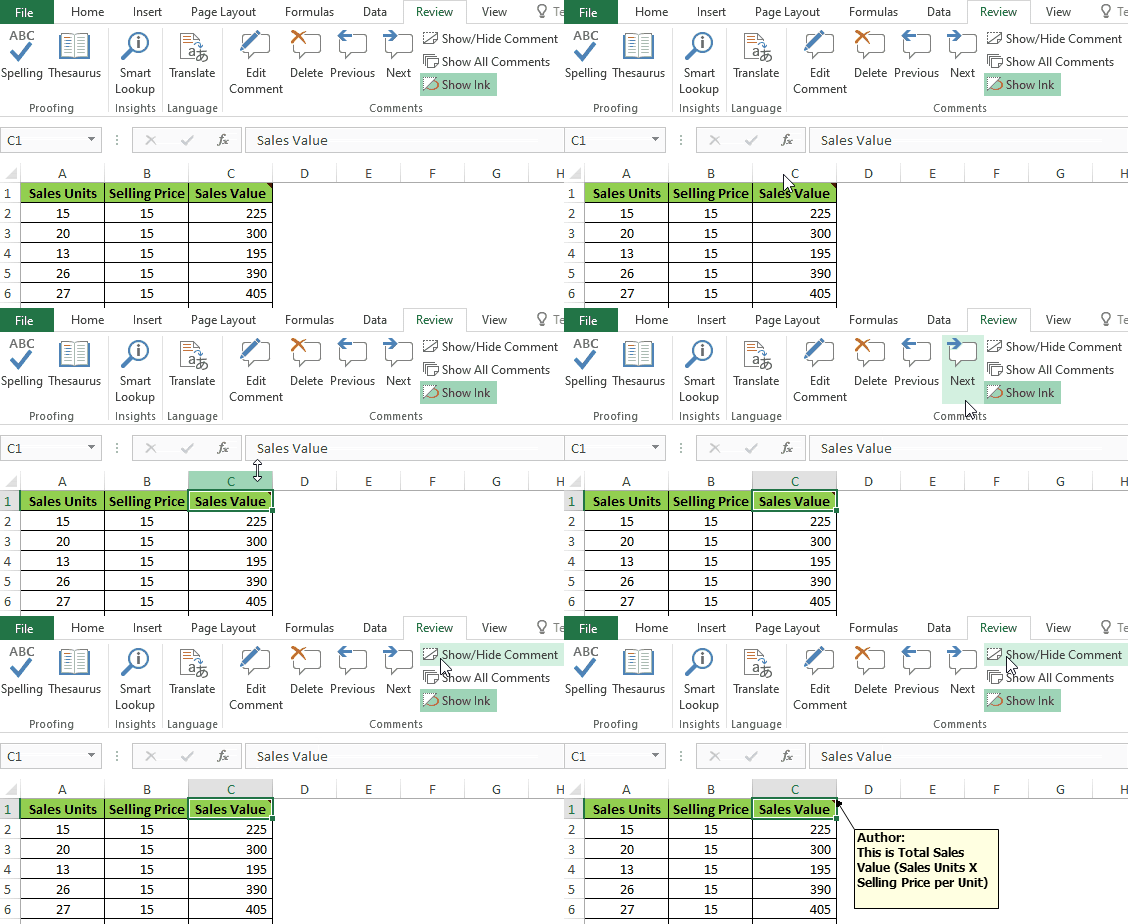
Similarly, to hide the comment, again click on the same option – “Show/Hide Comment”. The comment would hide.
Copy and Paste “Comments“
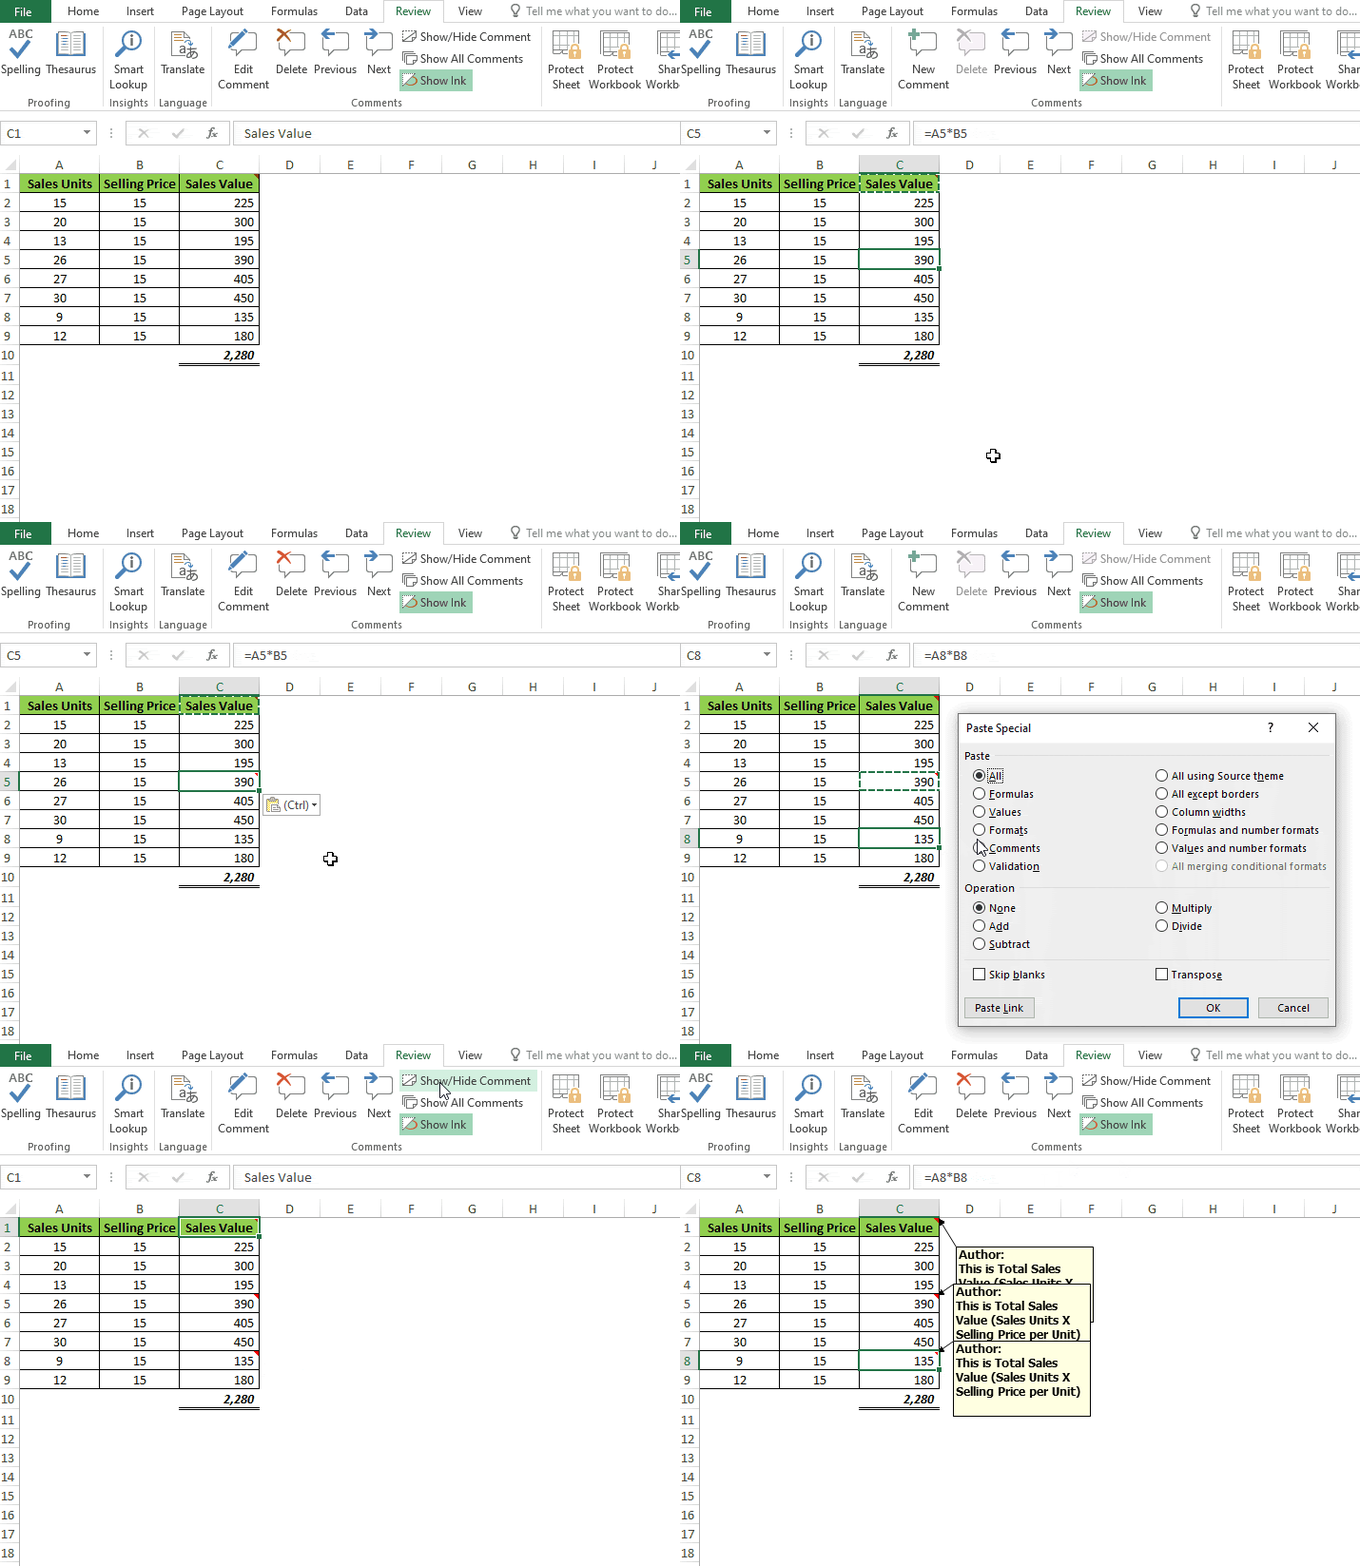
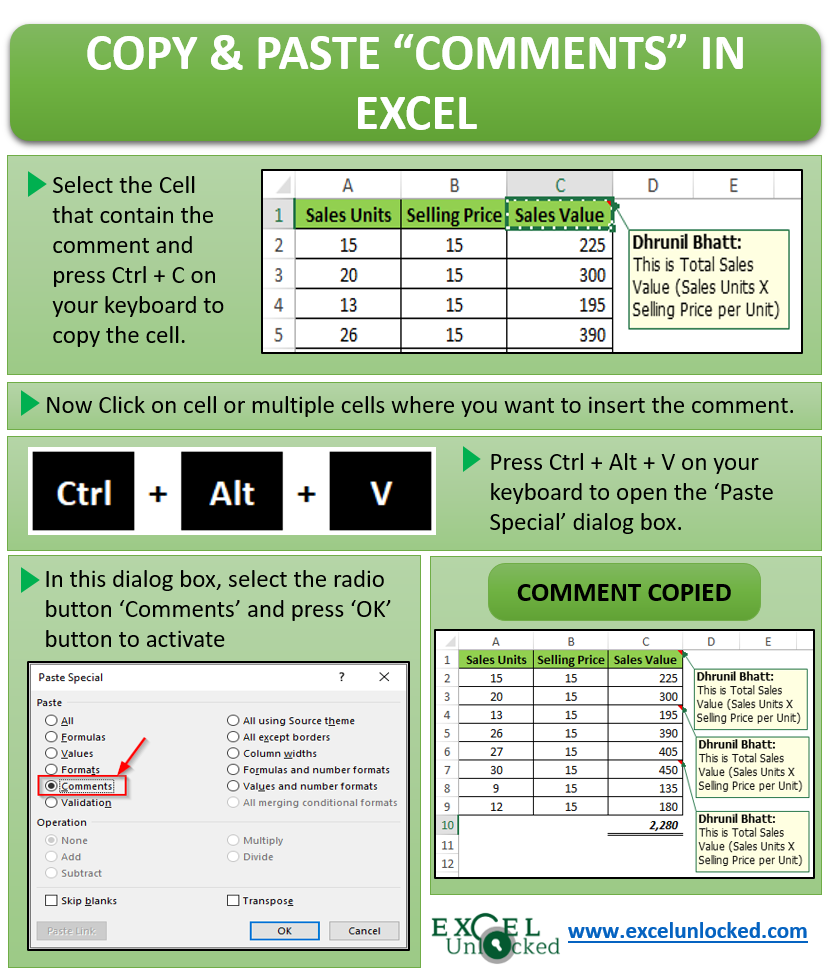
To copy and paste the comment, follow the below steps:
Select the cell that contains the comment.
Press Ctrl+C on your keyboard to copy the comment.
Now, select the cell to which you wish to paste this comment.
And press Ctrl+Alt+V on your keyboard. The “Paste Special” box would appear on your screen. In this dialog box, select the radio button “Comments” and click on the “OK” button.
Show/Hide All the “Comments” at One Go
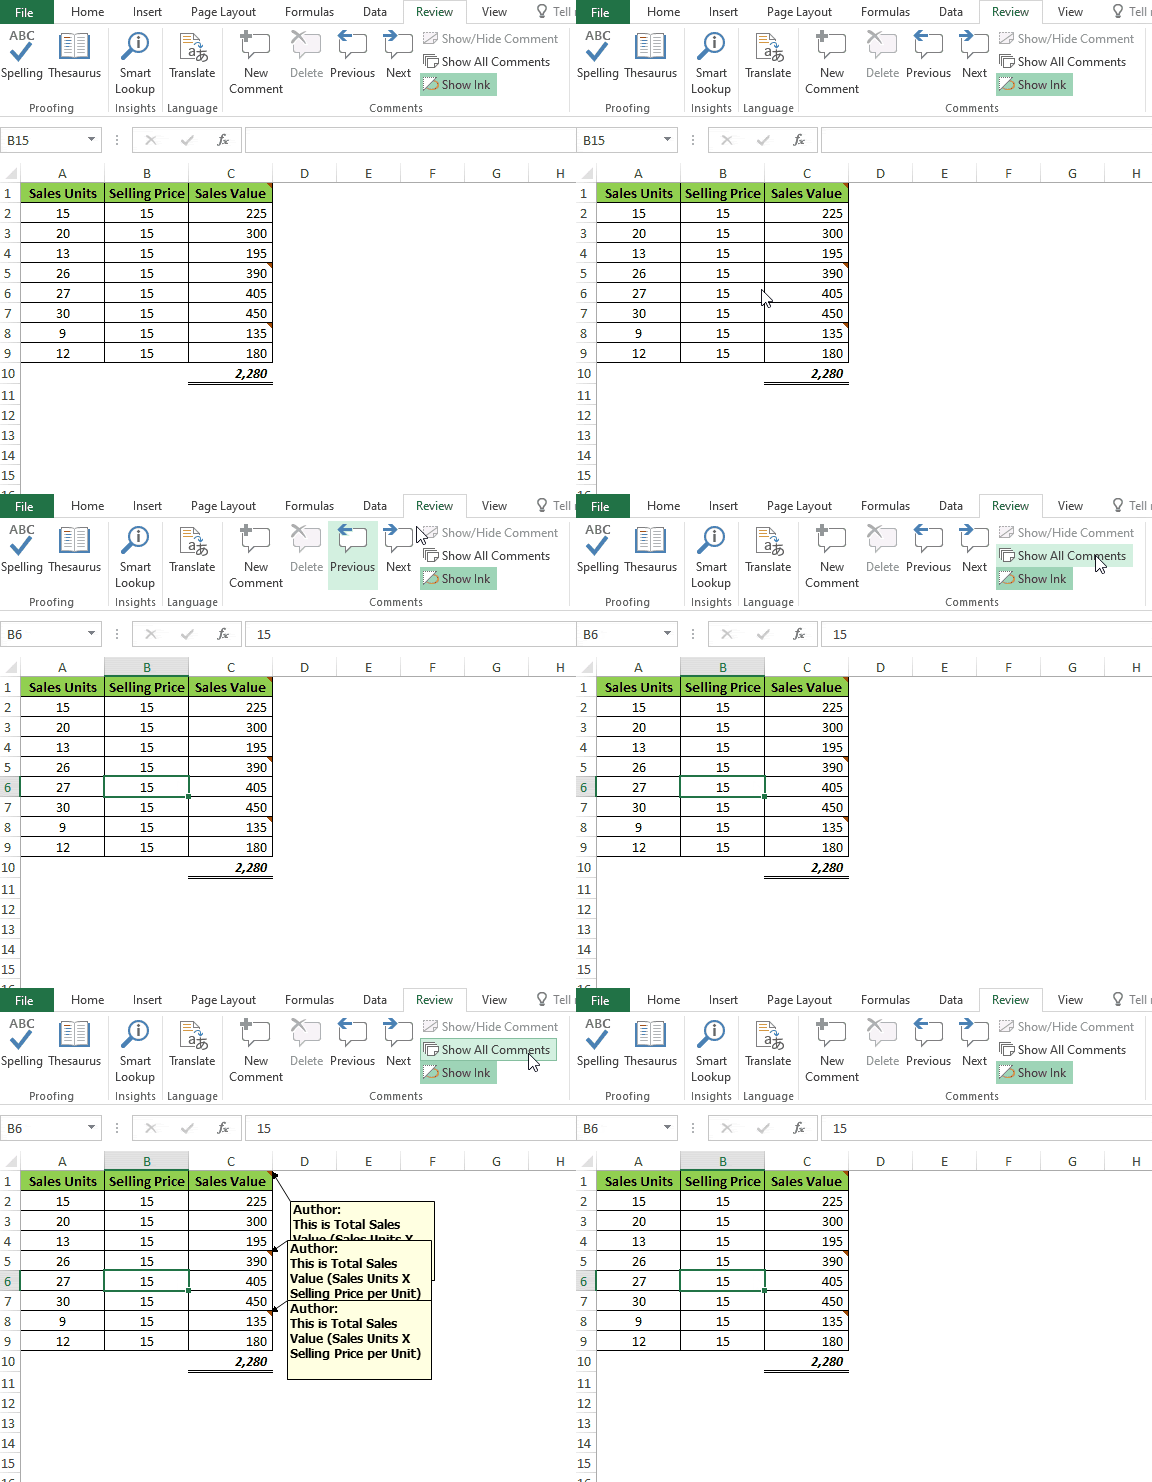
To show or hide all the comments at one click, click anywhere on the excel worksheet and then under the group “Comments” (in ‘Review’ tab), click on the option “Show All Comments”.
As a result, you can see that all the comments are visible at one go.
Reposition and Resize the “Comments“
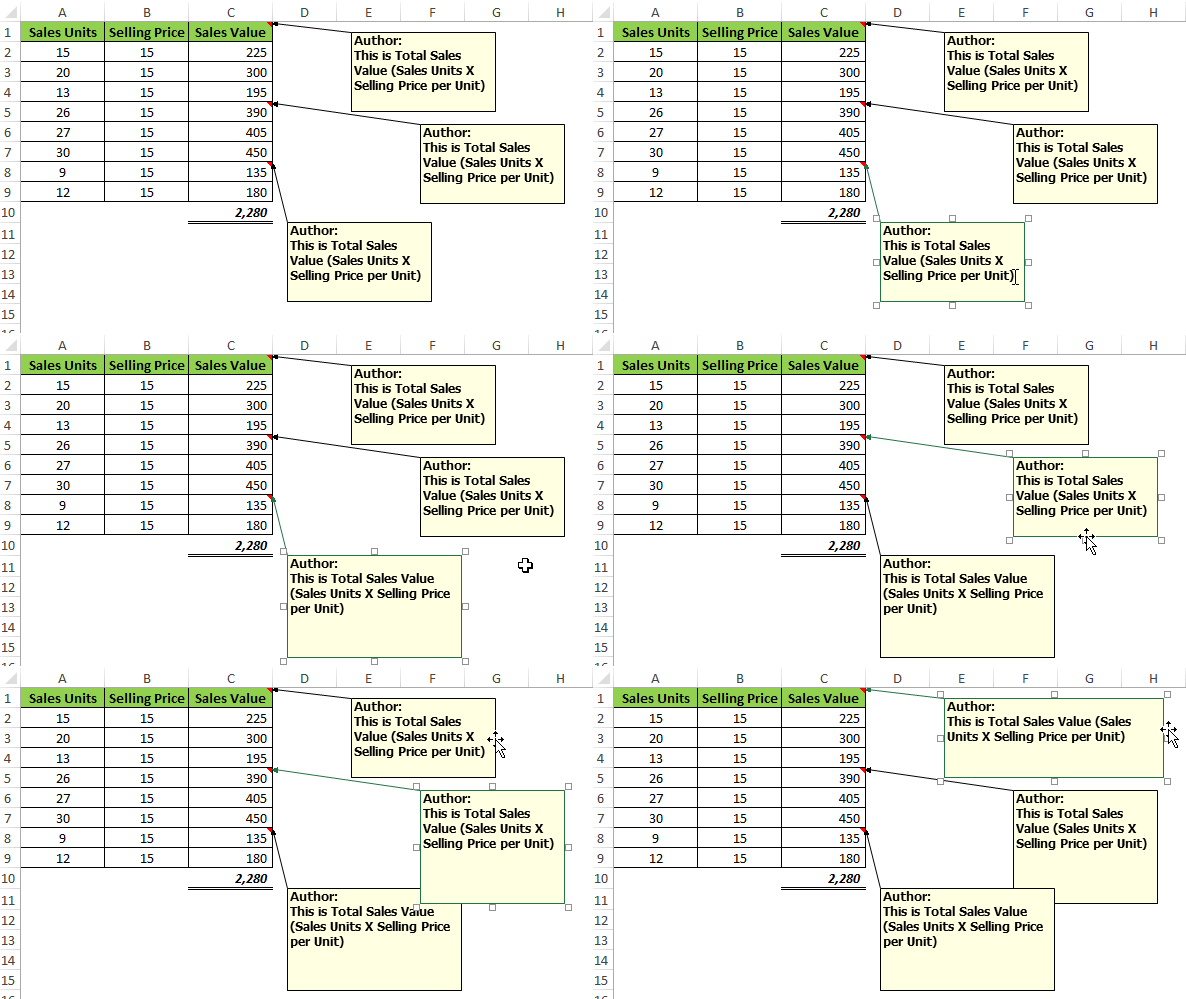
To reposition the comments in Excel, hover your mouse to the border of the comment box. The mouse cursor would change to a Plus sign.
Left-Click on your mouse (do not release it) to hold the comment and then drag the comment to the location where you want to place it.
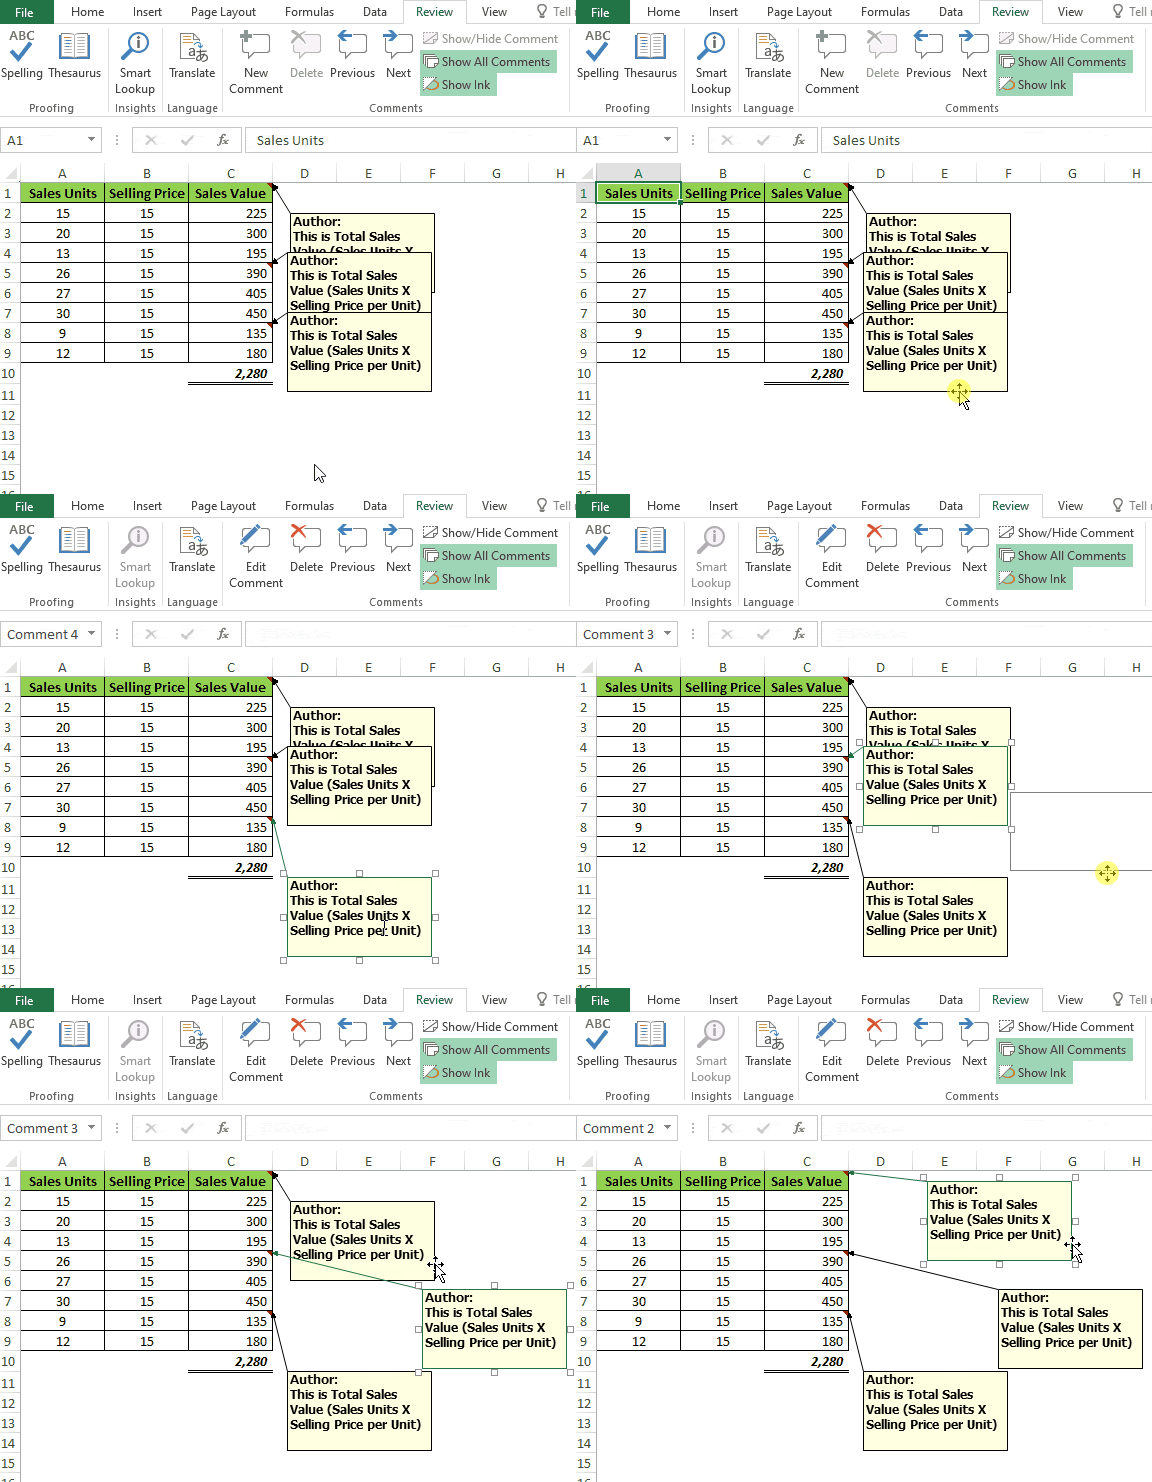
To resize the comments box, hover your mouse cursor to the squares on the border of the comment box. The mouse cursor would change to a line with arrows on both sides.
Now, left-click on your mouse (do not release it) and drag it resize the comment. Release the mouse once finished.
Change Background Color “Comment” in Excel
Changing the background color of an Excel comment can help you to classify the important excel comment (to which you want to draw user’s attention). You can, for example, give ‘Red’ as the comment background color for the highly important comment, etc.
This can be done using the “Format Comment” functionality of Excel.
Follow the below procedure:
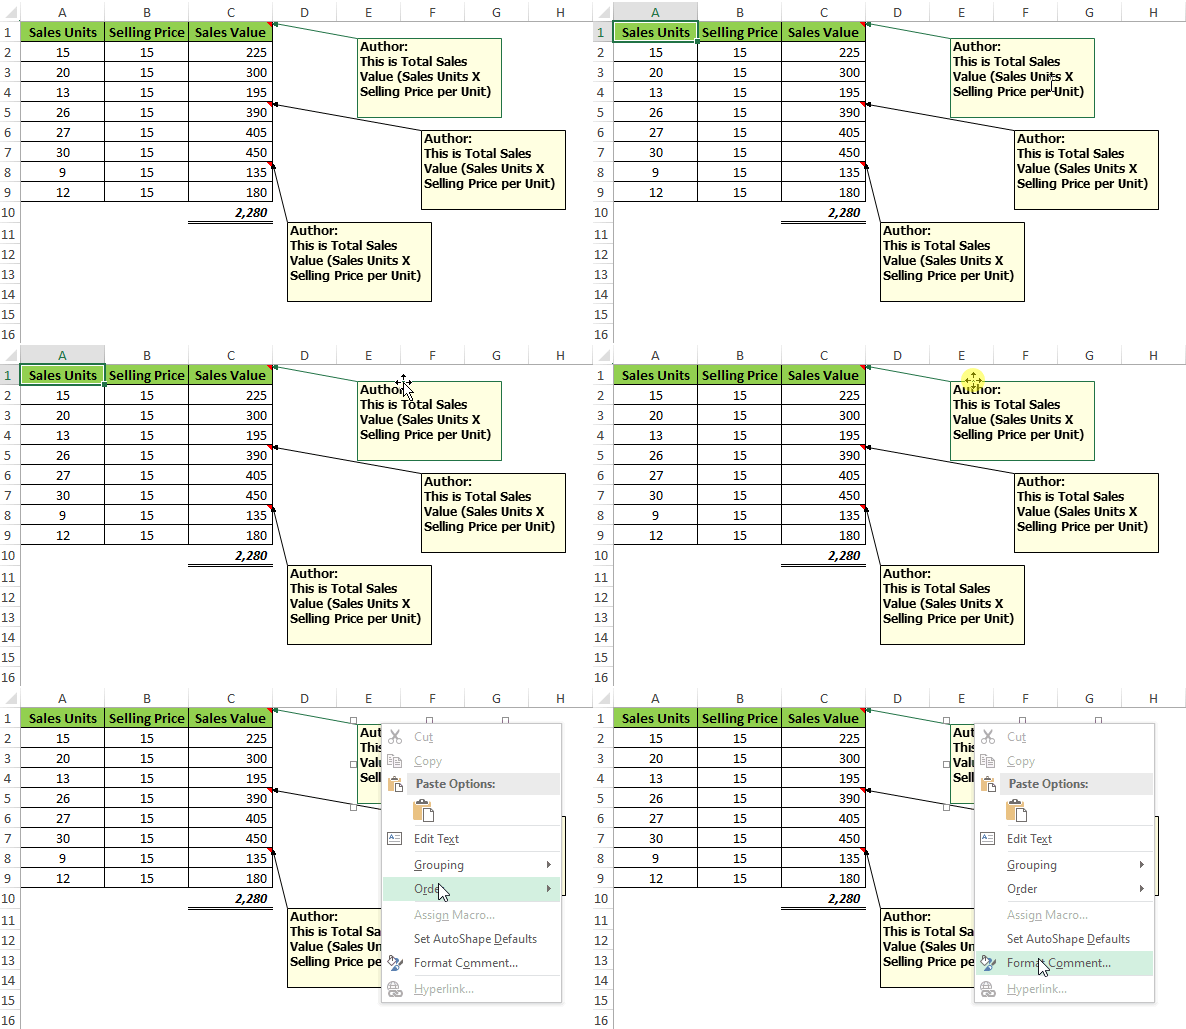
Select the comment for which you want to change the background color. Then, right-click on the border of the comment (as demonstrated in the screenshot below).
From the list of drop-down option, click on the option ‘Format Comment’.
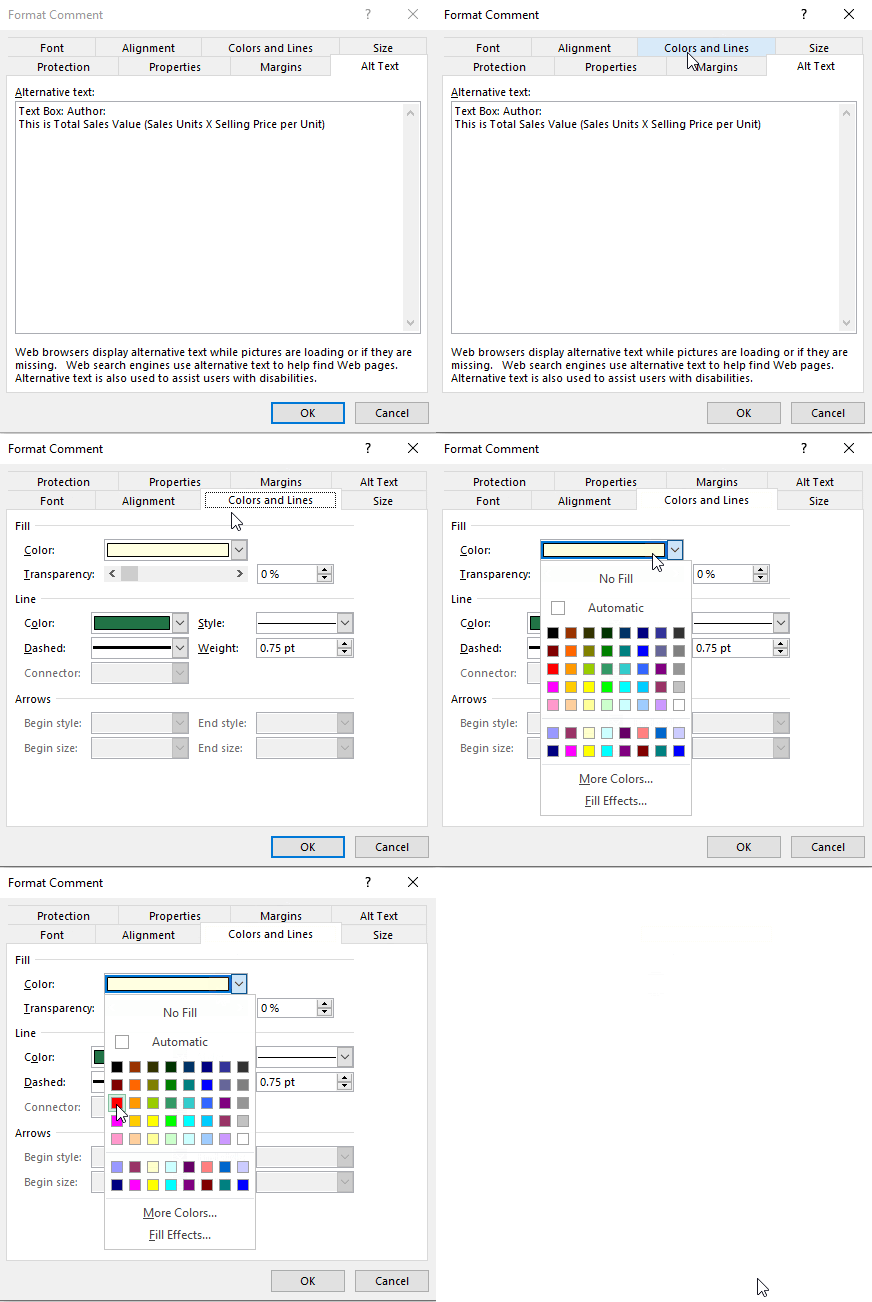
This would open the “Format Comment” dialog box on your screen.
In this dialog box, go to the “Colors and Lines” tab. In the “Fill” section of this tab, select the color of your choice from the list of colors available. And then press “OK” to activate the option.
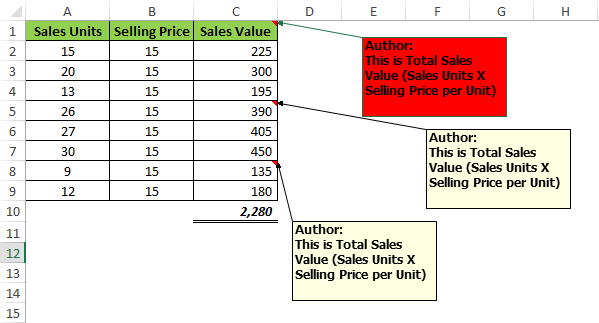
You would notice that the background color of the selected comment box changes to ‘Red’.
Similarly, you can change the border settings of the comment box. For Example, changing the border color, style, thickness, etc. using the line section of the “Colors and Lines” tab.
Aligning the Text in Comment Box
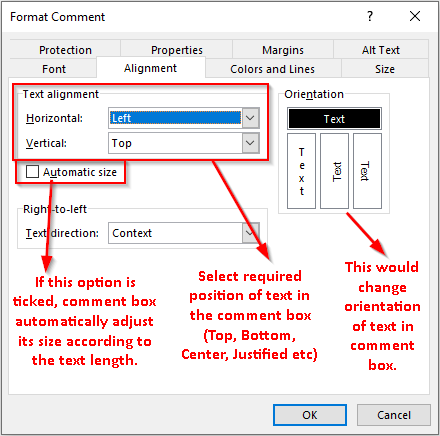
To adjust the position of the content within the comment box, follow the below procedure:
Select the comment to which you want to make the changes.
Open the “Format Comment” dialog box, by right-clicking on the selected comment box and selecting the option ‘Format Comment’.
Go to the “Alignment” tab, and make the settings as per your need.
How to Print Excel Comments?
To print the Excel Comments, we need to make some changes in the default settings in printing. Follow the below steps to do the same:
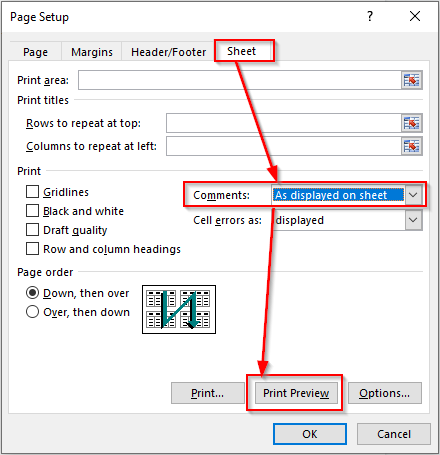
Go to the “Page Layout” Tab. Under the group “Sheet Options”, click on the dialog box launcher (It is a small square with an arrow on the bottom-right corner of the group).

A new dialog box would appear on your screen – ‘Page Setup’.
Under the “Sheet” tab, change the print comment settings from ‘(None)’ to ‘As displayed on Sheet’.
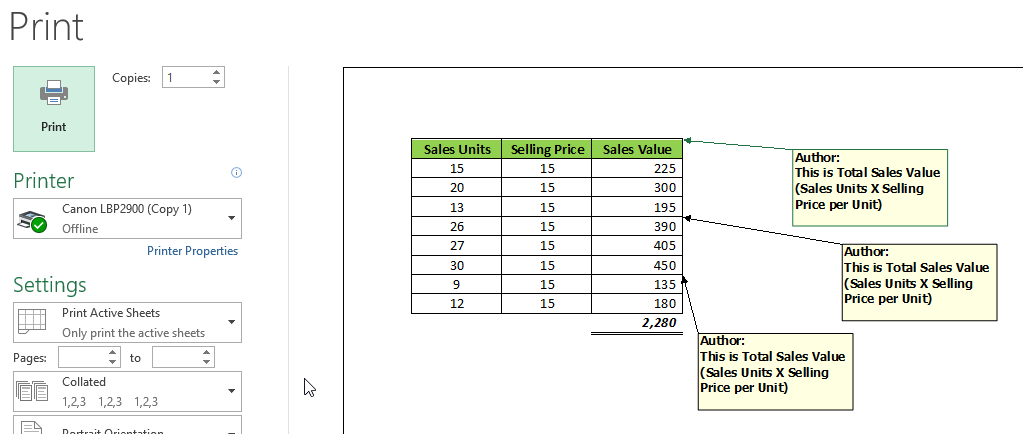
Now click on the “Print Preview” button to check the preview of this setting.
You would see that Excel shows the comments in the Print Preview.
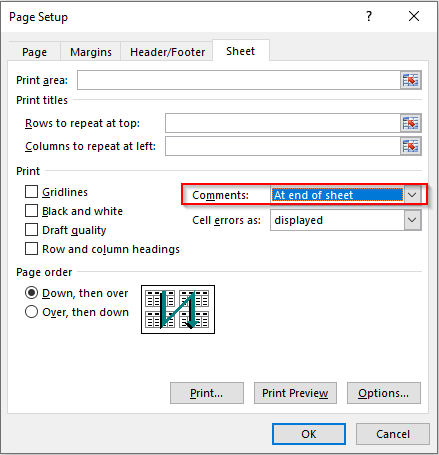
You can even print the comments at the end (after all the page contents end). For that, select the option “At end of sheet” as shown in the screenshot below:
Changing the Font Settings of Comment
To change the “Font” settings for Excel Comment, follow the below steps:
Select the comment. Right-Click on the border of the selected comment and click on the option ‘Format Comment’.
As a result, the ‘Format Comment’ dialog box will appear on your screen. Here, go to the tab named “Font”. There you can find all the font settings for a selected comment(s) including Font Style, Font Size, Font Color, etc.
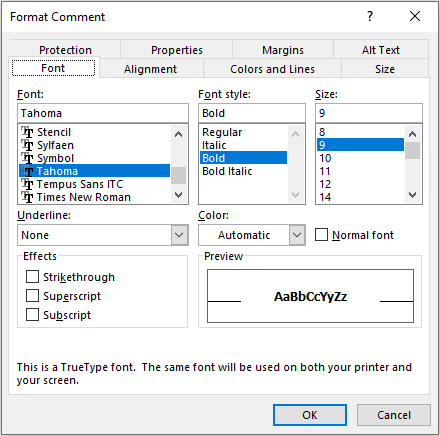
Make changes in the font settings as per your choice. As a result, you would see that the excel comment font, etc. settings updates.
With this you have reached to the end of this blog.
There is one bonus lesson for you on “Bonus Trick on Excel Comment Feature“. Click on the URL to learn more about it.
