In this blog, we would learn what is a custom list in Excel and how to create a new custom list. We would also learn to sort the data based on a custom list in Excel. The Custom List feature in Excel is a life-saver tool provided by Microsoft in Excel utility, which can save a lot of your time and precious efforts.
What are Custom Lists in Excel
A Custom list feature is an in-built feature provided by excel that enables the user to create their own list of texts or values (maybe thousands of values) and then enables to quickly add this custom list anywhere on your worksheet by simply selecting the list or by dragging it.
Before, starting to learn to add a custom list, let us do one small activity.
Firstly, write the month name ‘January’ in any of the cells in Excel and then, in the cell just below it, write the month ‘February’.
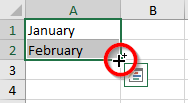
Now, select these cells and hover your mouse cursor to the bottom right corner of the selected range, till the cursor changes to the plus like symbol (called as Fill Handle)
Also Read: Sort Range using VBA – Table Header
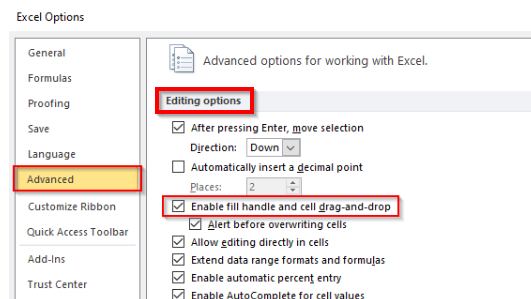
If you do not see the plus like symbol, that means you need to enable fill handle tool in Excel. To do so, go to File Tab > Options Button. In the ‘Excel Options’ dialog box that appears, check the option as highlighted in the image below.
Once, the ‘Fill handle’ tool is activated, left-click on your mouse and drag it downwards till 12th row and then, release the mouse button. As a result, the excel would automatically list the months in the year. Refer to the demonstration below.
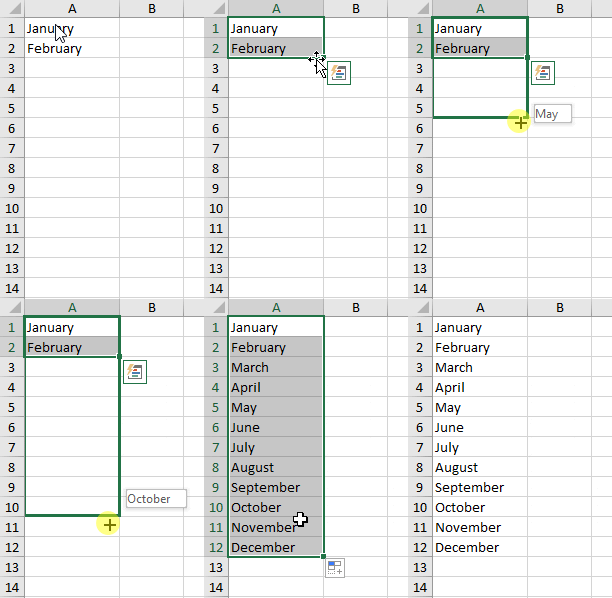
Excel somewhere knows that after February, comes March and so on. This is what is the Custom List Feature of Excel.
Similarly, if you type the first two days of the week (Monday and Tuesday) and use the fill handle tool, you can quickly write all the seven days of the week.
Also Read: Make a Calendar using the SEQUENCE Function
Where is Custom List Feature in Excel
To navigate to the custom list feature in Excel, follow the undermentioned path.
Go to File Tab > Options button > Advanced Option > General section > Edit Custom Lists … Button.
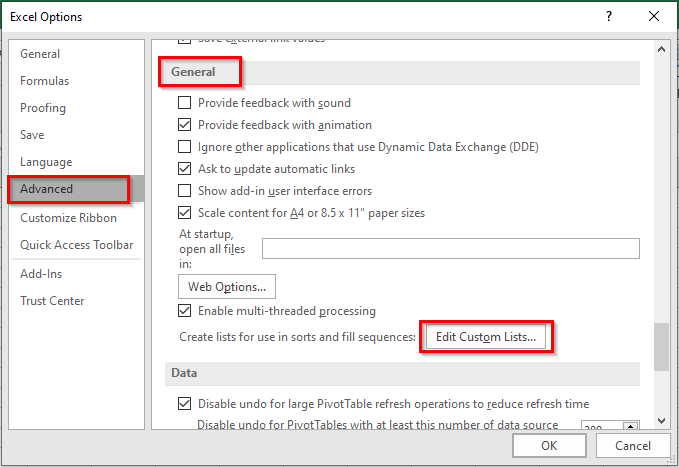
As soon as you click on this button, the ‘Custom List’ dialog box would appear on your screen where you can see the existing available custom lists and also create a new.
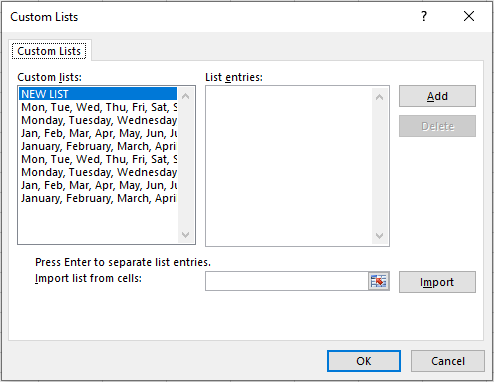
Let us now learn to create our own custom list.
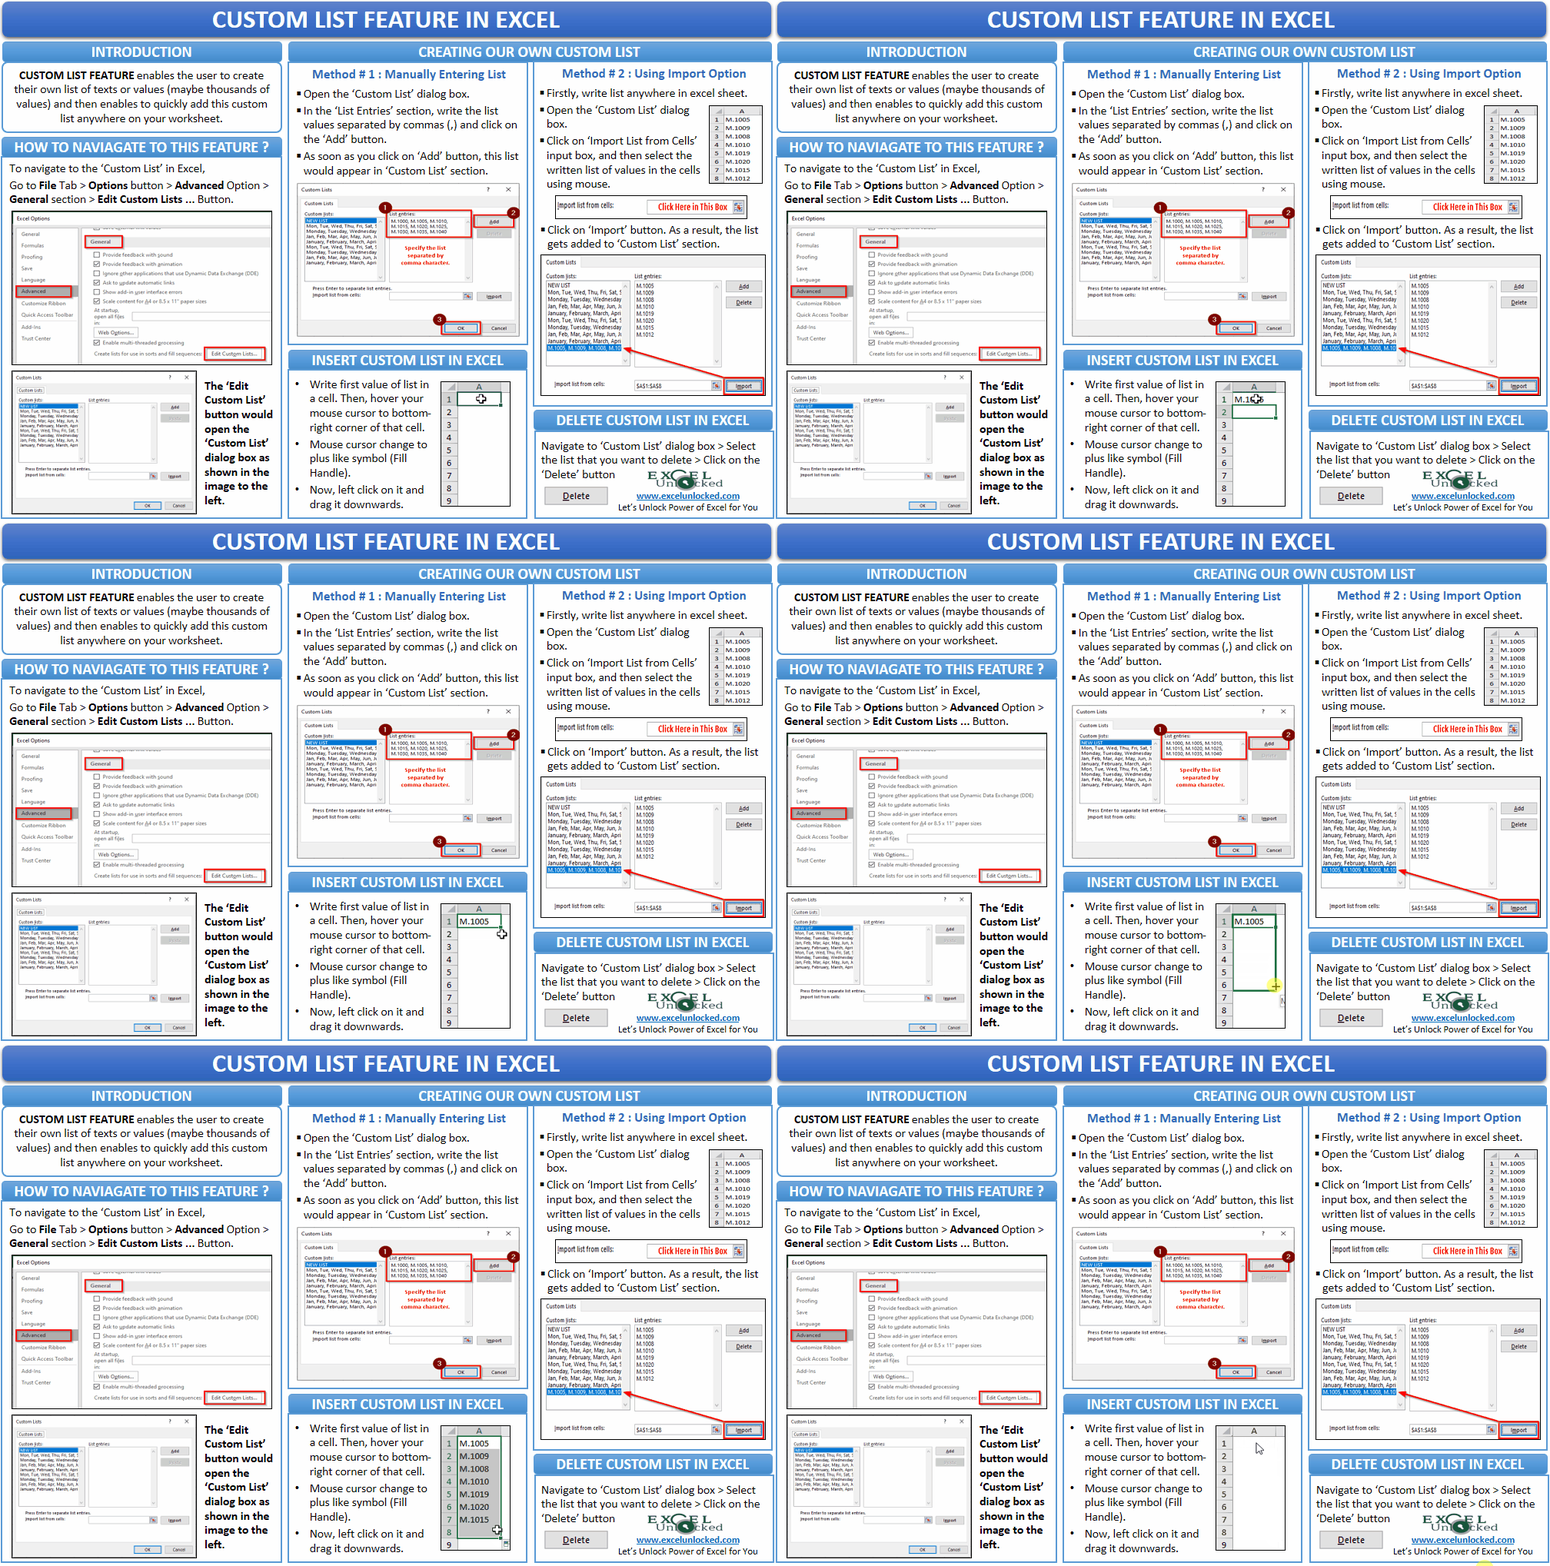
Create Our Own Custom Lists
Suppose you are working as a data entry operator in a company having thousands to products, each having a unique product code. You have to frequently insert this list of product codes in Excel. One way is to create this list somewhere (maybe in a notepad or word file) and then copy it from there and paste it in the cell each time you require it.
Alternatively, you can create a custom list for it and then use it each time you need to insert a list of material codes by any of the following methods:
- Entering manually in ‘Custom List’ dialog box
- Using the ‘Import’ feature
Manually Create a Custom List
To manually create a custom list, navigate to the ‘Custom List’ dialog box using the path – File Tab > Options button > Advanced Option > General section > Edit Custom Lists … Button.
Click anywhere inside the ‘List Entries’ section, and enter the list separated by comma characters and then click on the ‘Add’ button as shown in the image below:
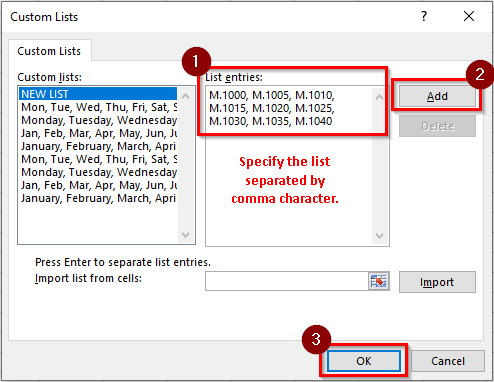
As soon as you click on the ‘Add’ button, the list would get added to the ‘Custom List’ section as highlighted in the image below:
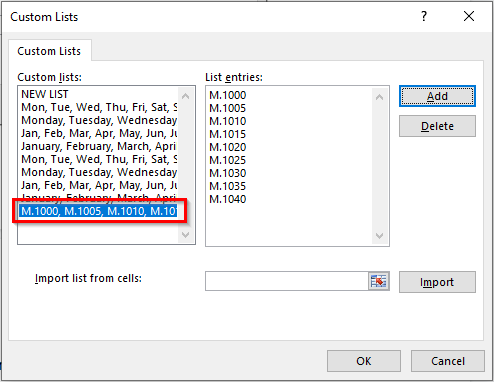
Create List Using ‘Import’ Feature
If you have a list of thousand values, creating the list manually is not a suggested technique. In that case, you can use the ‘Import’ button.
A pre-requisite is that you need to have the list for once in Excel.
Steps-
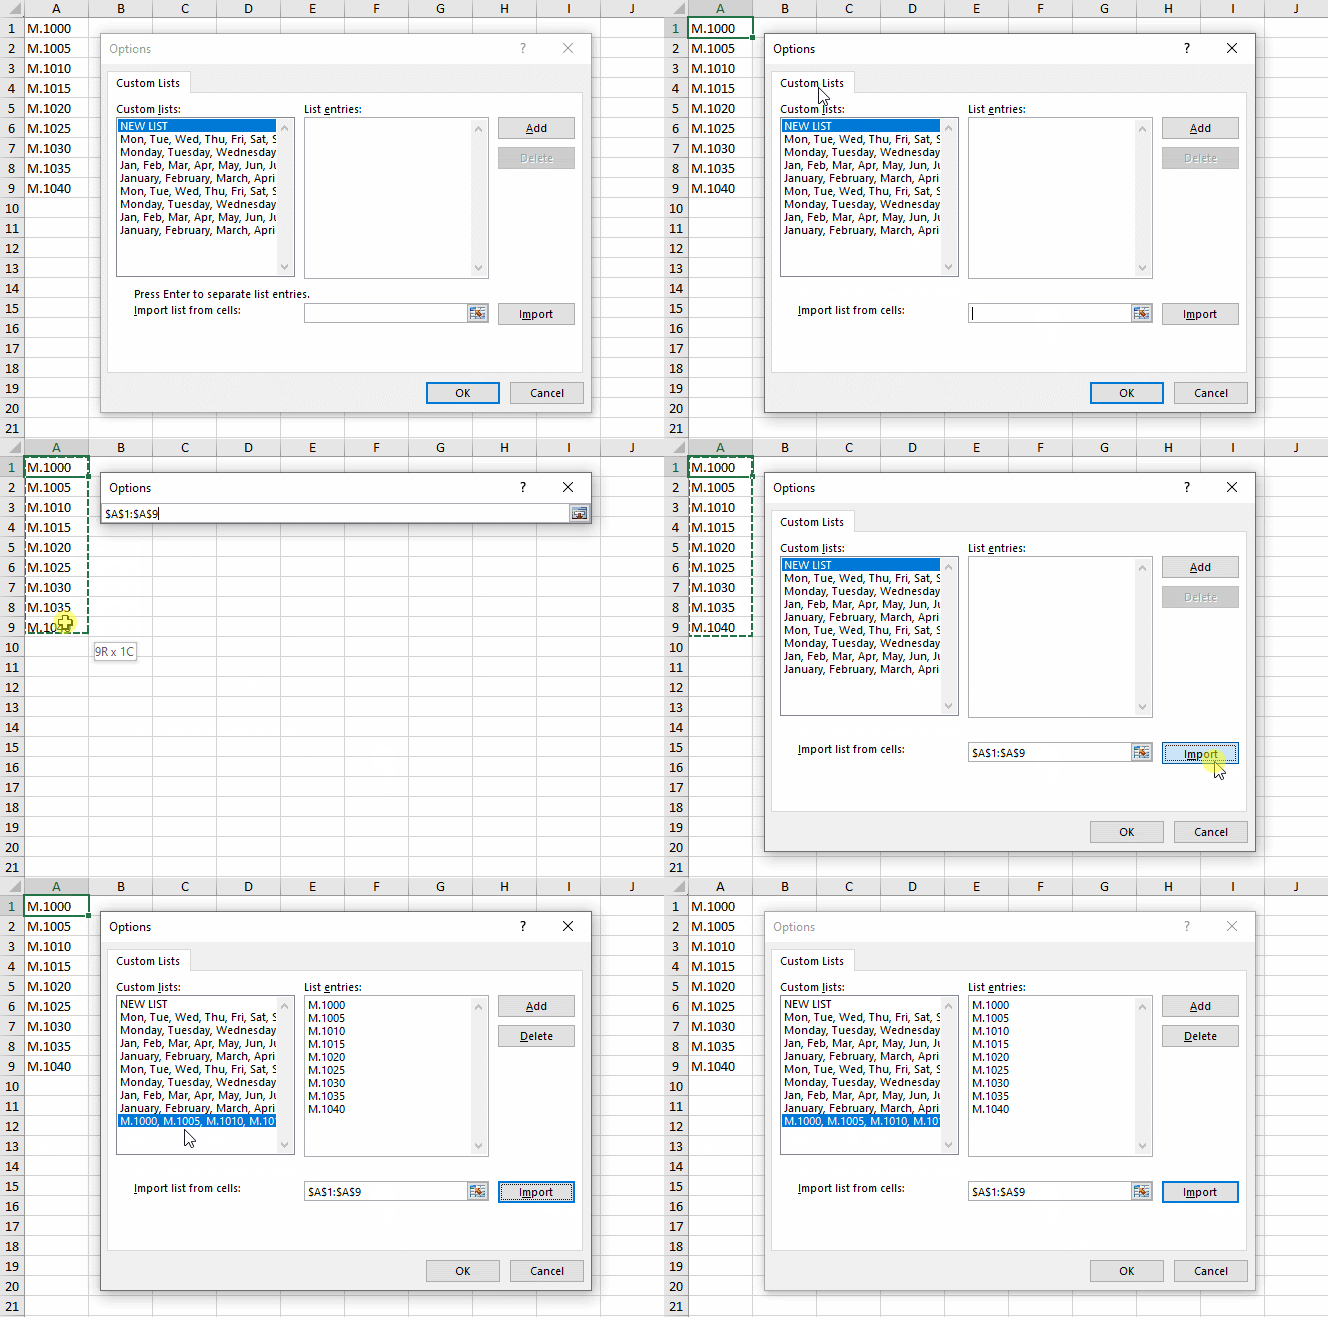
Click on the ‘Import List from Cells’ input box and select the range of values. Once selected, click on the ‘Import’ button. As a result, the list would get added to the ‘Custom List’ section. Click on ‘OK’ button to exit.
Insert Custom List in Cell
Now, when creating a custom list in Excel is done, you can insert the custom list in cells in Excel. To do so, follow the below steps:
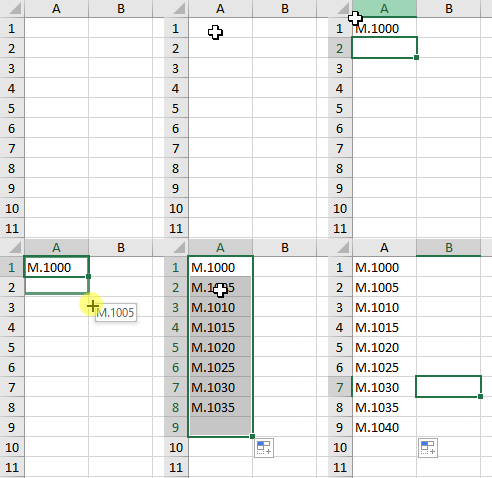
Enter the first value of the list in the cell (in our case it is M.1000).
Then, take your mouse cursor to the bottom-right corner of the cell, and the mouse cursor would change to a plus like a symbol (known as ‘Fill Handle‘). Once visible, left-click on your mouse and drag the mouse downwards to get the list as demonstrated below:
Create Custom Sorting Criteria in Excel
By default, you can sort the values/numbers/date in either ascending order or in the descending order. However, using the custom list in Excel, you can create your own customized sort in order to sort your list in order of this list.
Let us take one example to understand this better. See the below image:
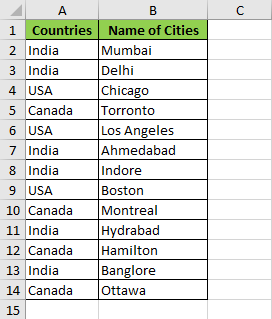
Suppose you want to sort the above list based on the countries in order – India, then the USA, and Canada.
You can see that sorting using the in-built sort feature will not allow you to sort in this order. Instead, it would sort in either ascending order (Canada, India, USA) or in descending order (USA, India, Canada).
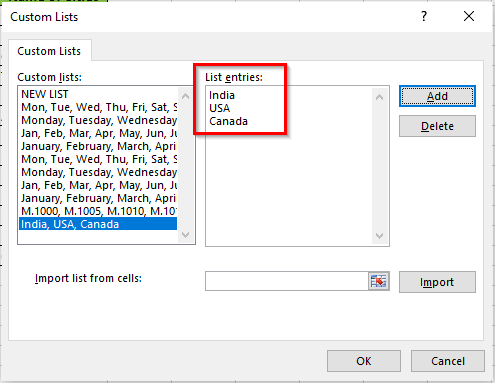
However, to sort in an order other than ascending or descending order, firstly, we need to create a list in custom sorting order – India, USA, Canada. Refer to the image below:
Now, sort the dataset, using the steps below.
Select the dataset A1:B14 and click on the ‘Sort’ button (under ‘Data’ tab > ‘Sort & Filter’ group). As a result, the ‘Sort’ dialog box would pop out on your screen.
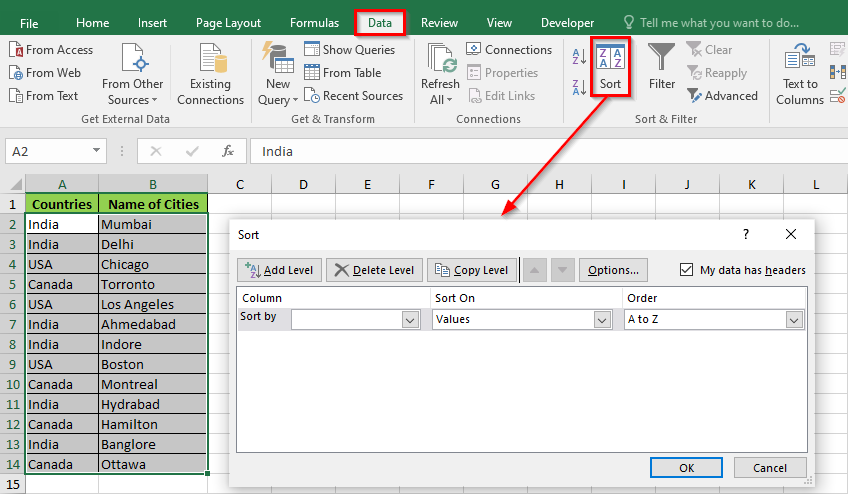
Before sorting your data, make sure that the ‘My data has headers’ checkbox is ticked.
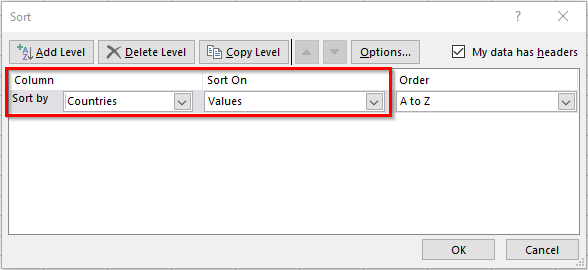
Under the ‘Sort by’ option, select the sorting column header as “Countries” and keep ‘Sort On’ as “Values”.
Under the ‘Order’ drop-down option, select ‘Custom Sort’ and as a result, the ‘Custom Lists’ dialog box would appear on your screen. Select the newly created Custom List (India, USA, Canada) and click on ‘OK’ to exit.
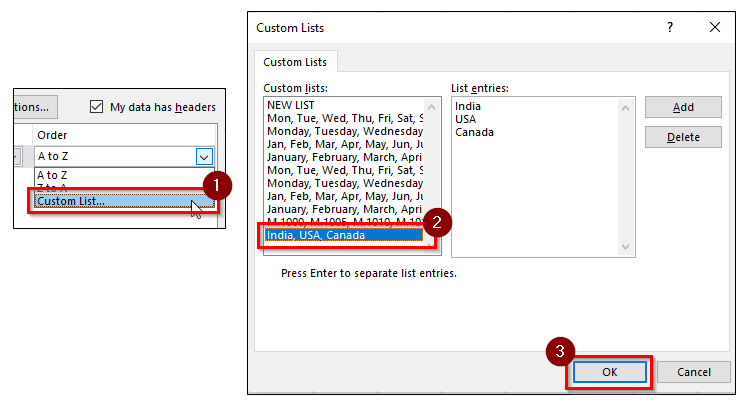
As a result, the custom list would appear in the ‘Order’ section of the ‘Sort’ dialog box. Finally, exit the ‘Sort’ dialog box by clicking on the ‘OK’ button.
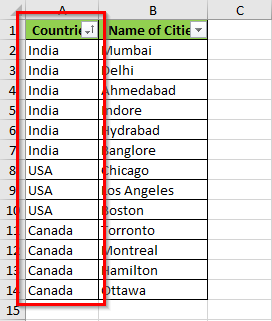
The excel would sort the dataset based on the newly created custom list as shown in the image below:
This brings us to the end of this blog. Share your views and comments in the comment section below.
