Today, we will make a User Form using VBA in Excel. This is a project and is very interesting to learn. UserForms make Data Entry significantly easier and are one of the essential applications for Visual Basic for Applications.
So let us start learning.
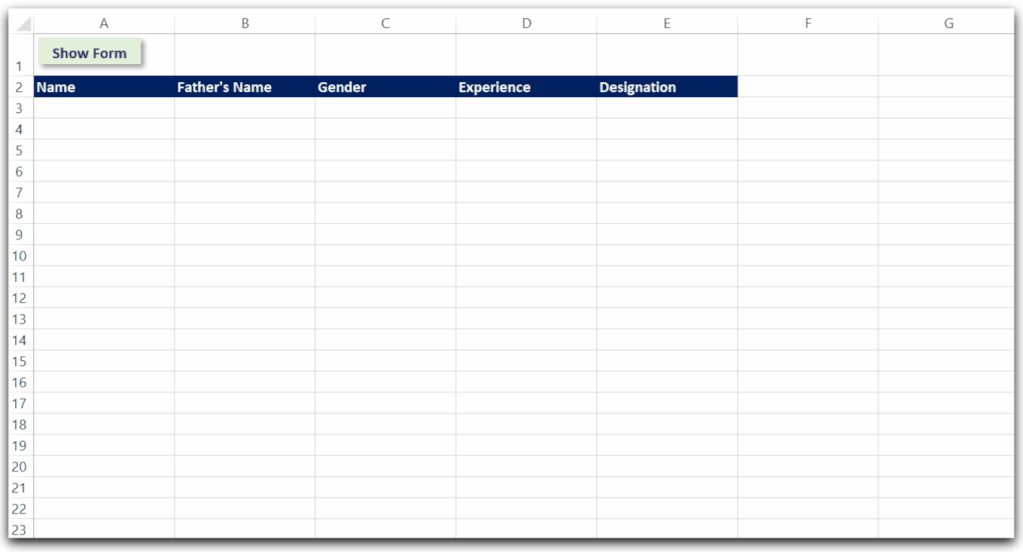
Employee Joining User Form
An Employee Joining User Form takes input from the user and then stores the records in the excel spreadsheet. The User Form makes Data Entry very simple and faster.
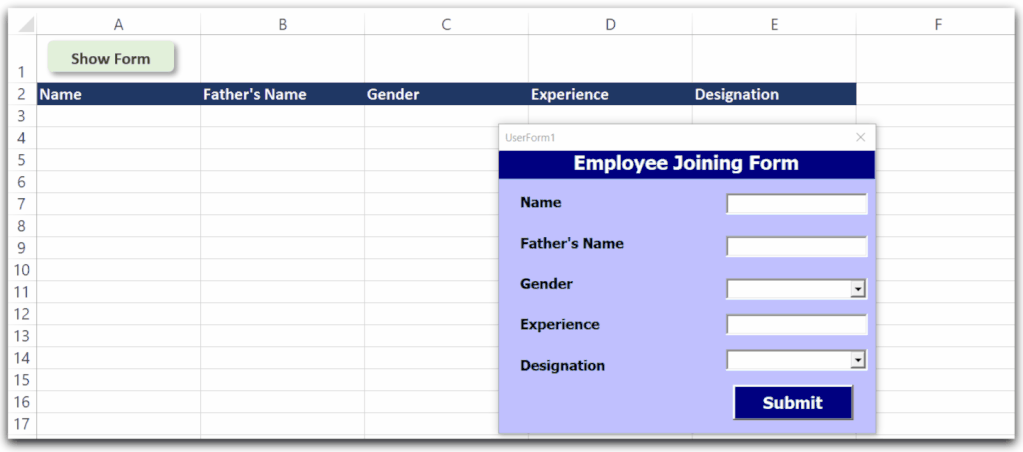
This is the resultant Employee Joining UserForm that we would have prepared by the end of this article.
The article is divided into the following steps to create Employee Joining User Form.
- Designing
- User Form
- Text Box
- Combo Box
- Spreadsheet
- Data Sheet
- Named Ranges for Combo Box
- Button to Run UserForm
- User Form
- Coding
- Submit Button
- Open UserForm
This User Form is very easy to create when the steps are followed correctly.
You can use the following practice workbook to follow along.
Designing the Employee Joining User Form
In this section of the article, we will learn to design the user form and the spreadsheet in which the user form will store its records.
Designing User Form
The User Form includes text boxes, labels, and combo boxes to take input from the user. Follow these steps to design the Employee Joining User Form.
Also Read: Strings in VBA – Fixed and Variable Length
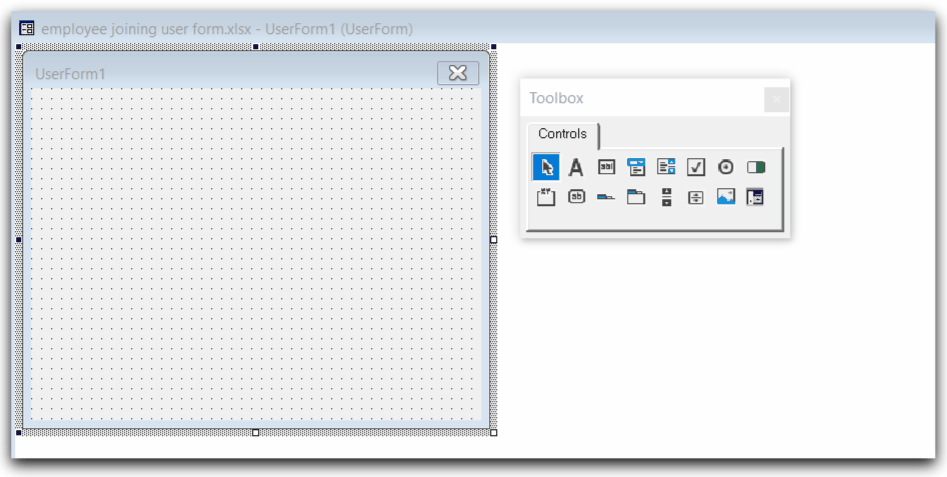
- Take a new excel workbook and press Alt and F11 keys to open the Visual Basic Editor.
- Select the VBA project for the current workbook in the Project Explorer window. Go to the Insert tab and insert a new UserForm.

- Now Press the F4 key to open the Properties Window (used later).
- From the ToolBox next to the UserForm, click on Label and drag the cursor on the user form to add a label.
- Take five more labels. Align and resize them like this.

- Change the following properties of labels from the properties window.
| Name | Caption | Font | BackColor | Width |
| Label1 | Name | size=12, Bold | from Palette | 120 |
| Label2 | Father’s Name | size=12, Bold | from Palette | 120 |
| Label3 | Gender | size=12, Bold | from Palette | 120 |
| Label4 | Experience | size=12, Bold | from Palette | 120 |
| Label5 | Designation | size=12, Bold | from Palette | 120 |
| Label6 | Employee Joining Form | size=16, Bold | from Palette | 320 |
Tip – To change the value of a property common to all labels, hold the ctrl key and click on labels to select them. Change the value of property from Properties window with the labels selected and it will change the propery value for all the labels.
Label 6 additional properties:-
- ForeColor – White
- TextAlign – 2 -fmTextAlignCenter
Now the labels look like this after we change their respective properties from the properties window.

- In the ToolBox, next to label control, we have TextBox. We will take three text boxes to input Name, Father’s Name, and Experience. We have changed the font size of the text boxes to 12.
- Again from the ToolBox, take two ComboBox to input the Gender and Designation.

- Take a Command Button from the Toolbox and change its caption to Submit, Set the Forecolor and Backcolor from the palette.
- Select the UserForm and change its BackColor property from the Properties Window to the color the same as the label background.
Press F5 key to run this user form and see how the design looks.


Designing SpreadSheet
Change the name of Sheet1 as Data and add the following column headings to it.

- Press Shift and F11 keys to insert a new worksheet and name Sheet2 as ComboBox Named Ranges. Take the following values for two combo boxes in the user form.

- Create two named ranges from range A2:A3 and B2:B6 and name them as gender and designation respectively. These two named ranges will be used to create a drop-down list for combo boxes in the user form.
- Insert a Rectangle Shape from the Insert tab into the Data Sheet as follows.

We have finished designing the form and more than half of the work is completed by now.
Coding for UserForm
Coding in VBA will make the form working and store data in the Data Worksheet. Follow the steps to implement the working of the User Form.
- Open the UserForm in the Visual Basic editor and couple click on the Submit Command button to open the code window for the submit button. Paste the following code in the code window. This code will be executed when the submit button is clicked by the user.
Private Sub CommandButton1_Click()
'create a worksheet object
Dim ws As Worksheet
'create a variable to store the row number where we wish to insert data
Dim next_row As Long
'set the worksheet to Data
Set ws = Worksheets("Data")
'get the row number of the row to insert data
next_row = Sheets("Data").Range("A" & Rows.Count).End(xlUp).Row + 1
'add data from userform to the cells in Data sheet
With ws
.Cells(next_row, 1).Value = Me.TextBox1.Value
.Cells(next_row, 2).Value = Me.TextBox2.Value
.Cells(next_row, 3).Value = Me.ComboBox1.Value
.Cells(next_row, 4).Value = Me.TextBox3.Value
.Cells(next_row, 5).Value = Me.ComboBox2.Value
End With
'empty the user form once data stored in the spreadsheet
Me.TextBox1.Value = ""
Me.TextBox2.Value = ""
Me.ComboBox1.Value = ""
Me.TextBox3.Value = ""
Me.ComboBox2.Value = ""
End Sub- Press the F5 key. Enter values for Name, Father’s Name, and Experience and click on Submit button.
- Now open the UserForm in the Visual Basic Editor and change the RowSource Property of the combo box to the name of the named ranges. This will add items to the drop-down list of the combo box when the form is running.
| Name | RowSource |
| ComboBox1 | gender |
| ComboBox2 | designation |
- Now Right Click on the Shape in Data Sheet and click on Assign Macro. Click on the New button in the Assign Macro Dialog box and enter the following code to show the userform1 when the shape is clicked.
Sub Rectangle1_Click()
UserForm1.Show
End Sub
This is it. We have completed coding the form and now you can close the Visual Basic Editor. Click on the Show Form button to open the user form. Enter Data to it and press the submit button to store it into the excel Data sheet.
This brings us to end.
Thank you for reading. ❤