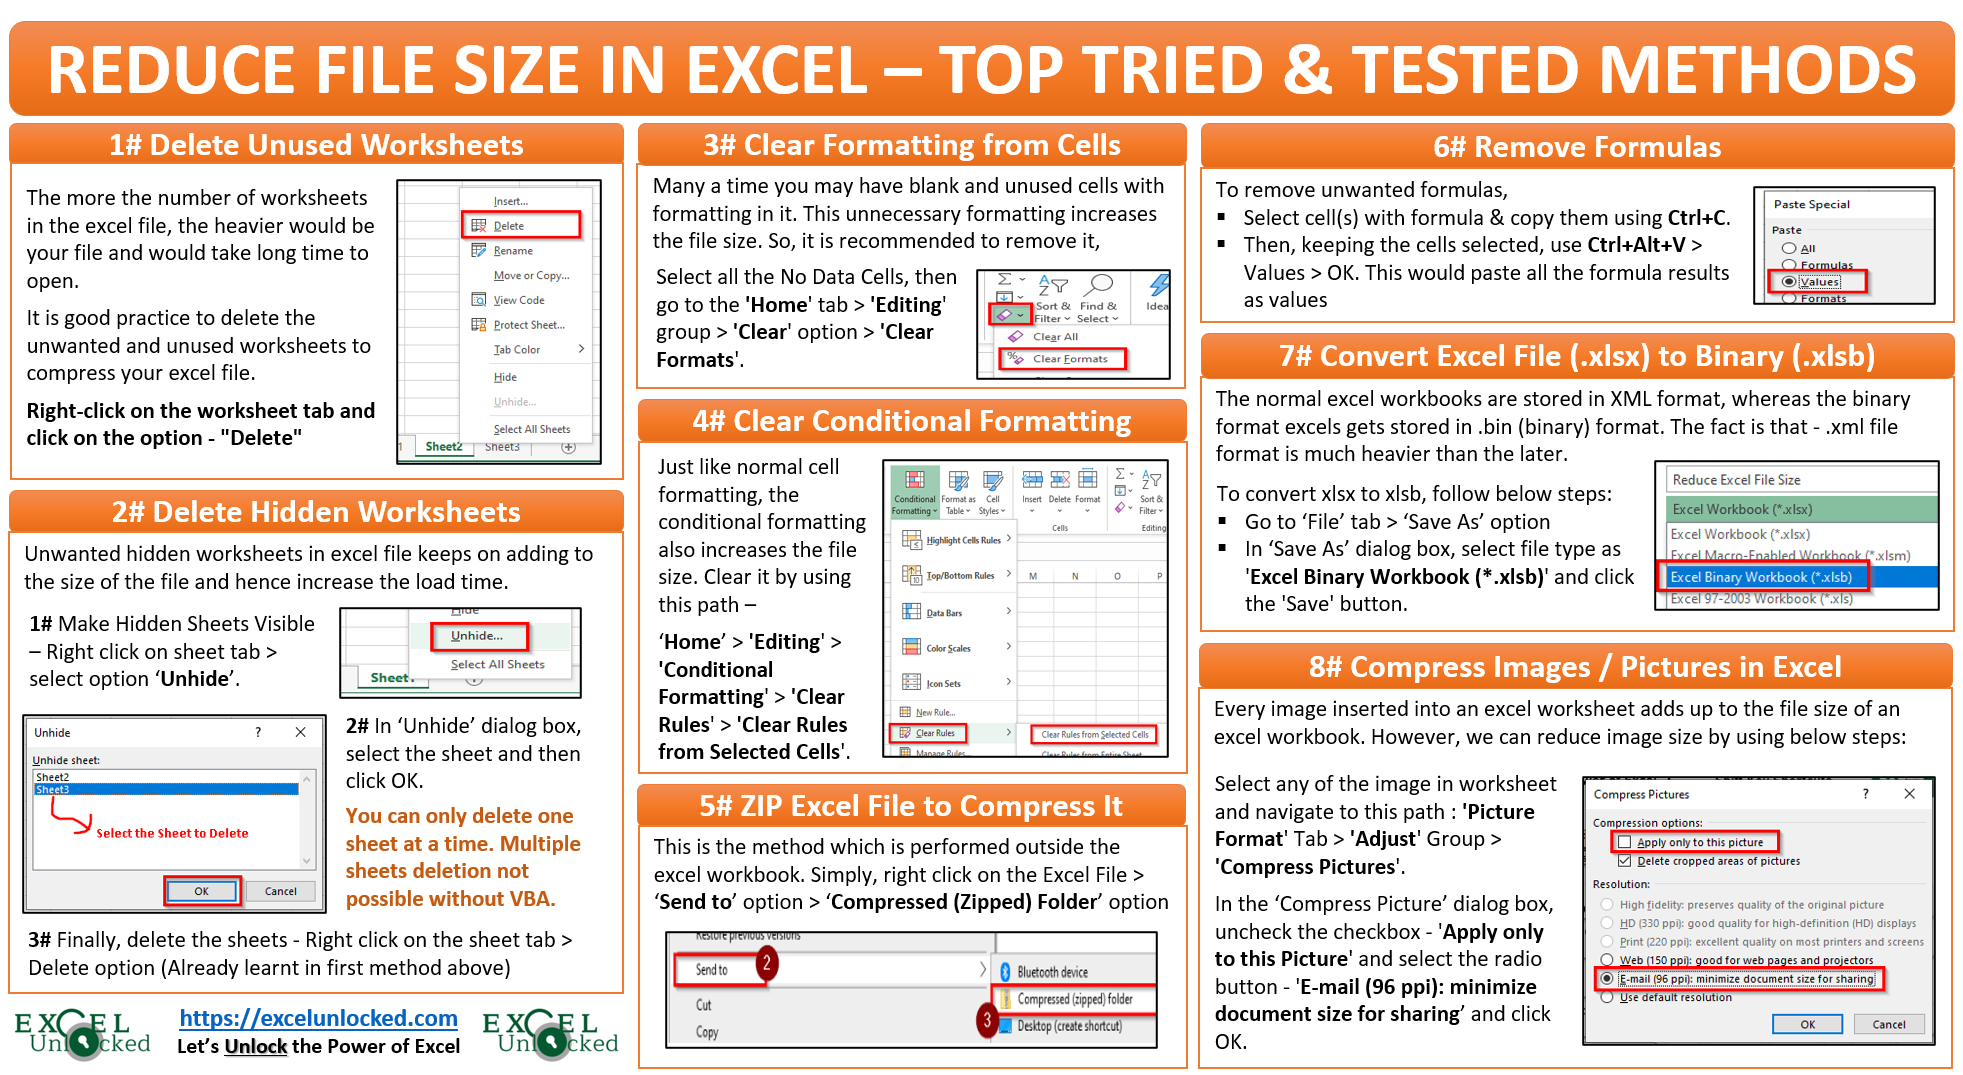
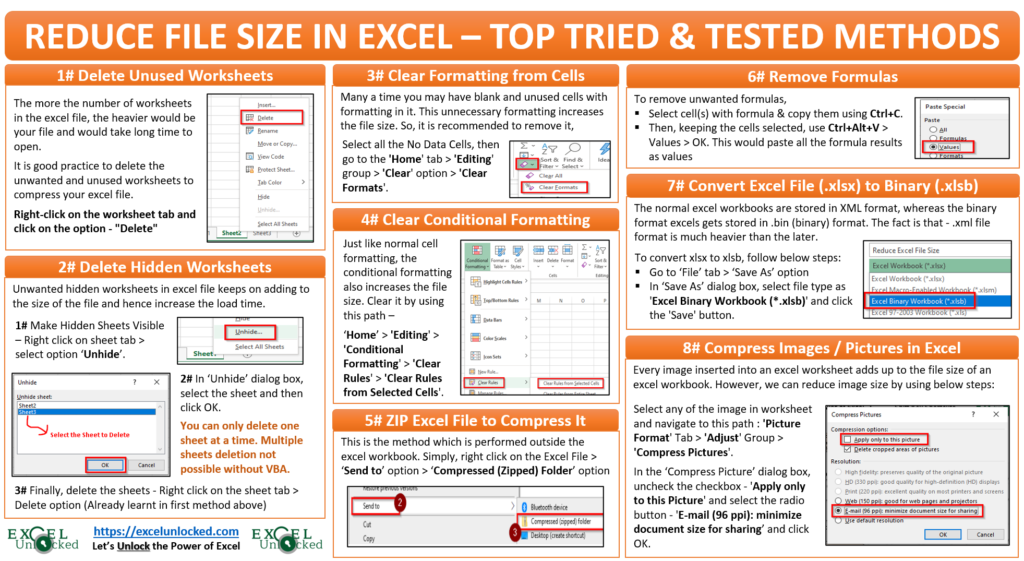
Many a time, excel user ask me this question that “Hey Dhrunil! How to Reduce and Compress Excel File Size?“. My simple answer to this question is – Clean your excel data and Remove unwanted stuff from your excel file, and you are done. In this blog, we would go through some of the well-tested possible solutions to the question – “Why my excel file takes too long to open?“
Why is There a Need to Compress Excel Size
The reason as to why someone would feel a need to reduce the file size of Excel as listed below:
- Why is There a Need to Compress Excel Size
- Quick Ways to Reduce Excel File Size
- 1# Remove or Delete Extra Worksheet
- 2# Remove or Delete Hidden Worksheet
- 3# Delete Hidden and Unwanted Rows or Columns
- 4# Remove Formatting from the Cells
- 5# Clear Conditional Formatting from Cells
- 6# Remove Unwanted Formulas from Excel Worksheet
- 7# Convert the Excel File (.xlsx) into Binary Format (.xlsb)
- 8# ZIP Excel File to Compress It
- 9# Compress Images or Pictures in Excel
- Reducing file size would save computer disk space.
- Reducing the excel file size would also speed up the initial loading time of the file.
- It is generally not possible to send large excel files as an email attachment. Reducing the file size would enable you to achieve this.
- It also enhances the reading and writing time of your RAM (Random Access Memory).
Quick Ways to Reduce Excel File Size
Listed below are a few of the tried and tested quick ways to instantly reduce the excel file size considerably. So, here we go.
1# Remove or Delete Extra Worksheet
By default, whenever you open a new excel workbook (Ctrl + O), excel inserts three worksheets (named Sheet1, Sheet2, and Sheet3). But most often, you use only the first worksheet to perform your calculations and keep the other two as it is.
Also Read: Learn Excel Keyboard Shortcut in Infographic
It is good practice to have a habit of deleting the unwanted and unused worksheets to compress your excel file. To achieve this,
- Simply right-click on the worksheet tab and click on the option – “Delete” as shown below:
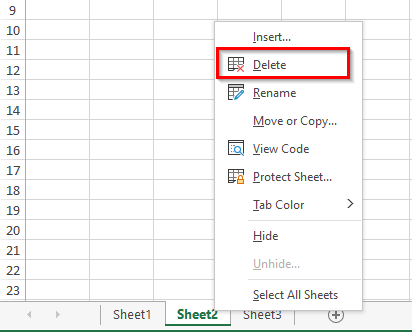
- To delete multiple worksheets at one go, you need to firstly group the excel worksheets and then right-click > Delete.
2# Remove or Delete Hidden Worksheet
When you are working on an excel file for a long time, it is quite possible that you may have created some temporary and short-term use worksheets. And more often you then finally hide these worksheets. The reason may be like you want to use these at some future date. These unwanted and hidden worksheets keep on adding to the excel file size.
To remove these hidden worksheets, firstly make them visible and then delete.
- To make the hidden worksheets visible, right-click on any of the worksheet tabs and select the option – ‘Unhide’.
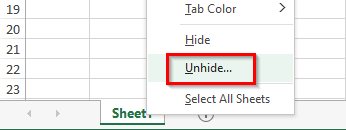
- In the ‘Unhide’ dialog box that appears, select the worksheet that you want to make visible and click OK. Note that you can only unhide one worksheet at a time.
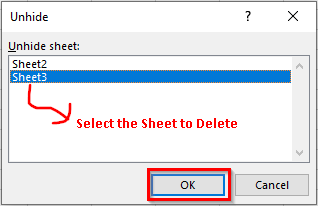
- Finally delete the unwanted worksheets (Right-click > Delete).

3# Delete Hidden and Unwanted Rows or Columns
Like worksheets, many times you may hide the rows or columns that you do not need, and as a result, unknowingly this increases the excel file size.

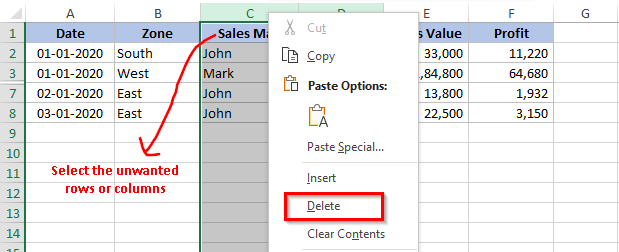
In that case, unhide the hidden rows/columns and then delete the unwanted ones.
- To unhide hidden rows/columns, select the hidden area, right-click on the headers and click on the option ‘Unhide’.
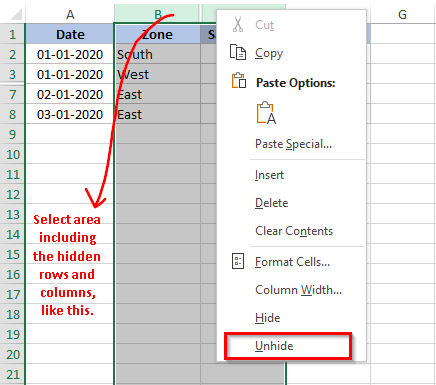
- Once the rows or columns are visible, select unwanted row or column, right-click on the header and select the option – ‘Delete’.
4# Remove Formatting from the Cells
Many a time, the excel file may have some formatting in an empty cell (having no content) that is not visible directly. For example, you may have bold cell formatting and white background in all the cells in a worksheet. But as there is no content in the cells, the formatting is not easily visible.
Also Read: How to Hide or Unhide Row or Column in Excel
This unwanted cell formatting increases the file size. To remove this formatting,
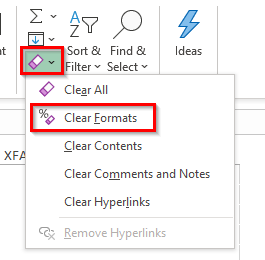
- Select all the blank and unused cells and then navigate to the ‘Home’ tab > ‘Editing’ group > ‘Clear’ option > ‘Clear Formats’. See the image below:
5# Clear Conditional Formatting from Cells
Just like normal cell formatting, applying conditional formatting to the cells also increases the excel file size. To reduce the same, removing conditional formatting is an effective option available.
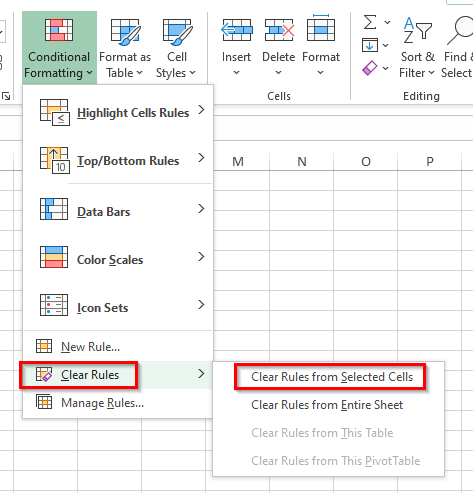
The ‘Clear Format’ option does not work for conditional formatting. In order to remove conditional formatting from the cells,
- Firstly, select the cells and then navigate to the path – ‘Home’ tab > ‘Editing’ group > ‘Conditional Formatting’ > ‘Clear Rules’ > ‘Clear Rules from Selected Cells’.
6# Remove Unwanted Formulas from Excel Worksheet
This is one of the biggest reasons why your excel file is slow. Having too many complex formulas in excel file takes CPU time to do calculations and makes your excel file heavy.
If you find some of the formulas as unwanted and do not those, the best way is to paste the calculated result as values.
To achieve this,
- Select the cell(s) and use keyboard shortcut Ctrl + C to copy the cells.
- Now, use keyboard shortcut Ctrl + Alt + V to open Paste Special dialog box. Here, select the radio button ‘Values’ and click OK, as highlighted below:
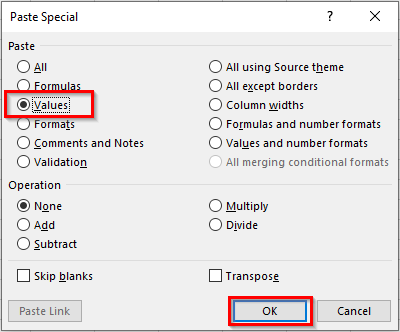
This would instantly paste the formula results as values.
However, if you do need the formulas as well and still wish to reduce the size of your excel worksheet, you can switch off the automatic formula calculation, and set it to ‘Manual’ calculation.To achieve this:
- Go to the ‘Formulas’ tab > ‘Calculation’ group > ‘Calculation Options’ > Click on ‘Manual’.
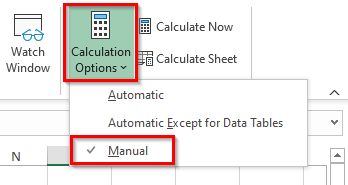
With this, whenever you make any change in the excel file, the complex formulas in it will not recalculate by itself. It will only calculate when you want it to do so. To manually recalculate the formulas, simply use the F9 function key.
Alternatively, you may also use this path – ‘Formulas’ tab > ‘Calculation’ group > ‘Calculation Options’ > ‘Calculate Now’.
7# Convert the Excel File (.xlsx) into Binary Format (.xlsb)
The best way to reduce the file size drastically is to convert the normal file (generally .xlsx) into a binary format file (.xlsb). The normal excel workbooks are stored in XML format, whereas the binary format excels gets stored in .bin (binary) format.
Not going much into the technicality of what .xml and .bin formats are, just remember that the .xml file format is much heavier than the later.
Below are the steps to convert an excel file into binary format file –
- Go to the ‘File’ tab under the ribbon tabs, and click on the ‘Save As’ option.
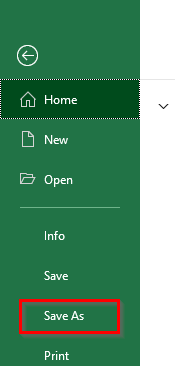
- In the Save As dialog box that appears, select the file type as ‘Excel Binary Workbook (*.xlsb)’ and click the ‘Save’ button. See the image below:
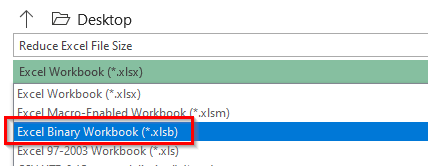
Now, if you check the folder/location, you would see that another excel workbook with extension “.xlsb” gets saved. Check its file size and you would see the difference.
8# ZIP Excel File to Compress It
This is the method which is performed outside the excel workbook. Meaning, this method reduces the excel file size without changing any of the content and the formatting.
- Simply right-click on the file and then choose the option Send To > Compressed (Zipped) Folder.
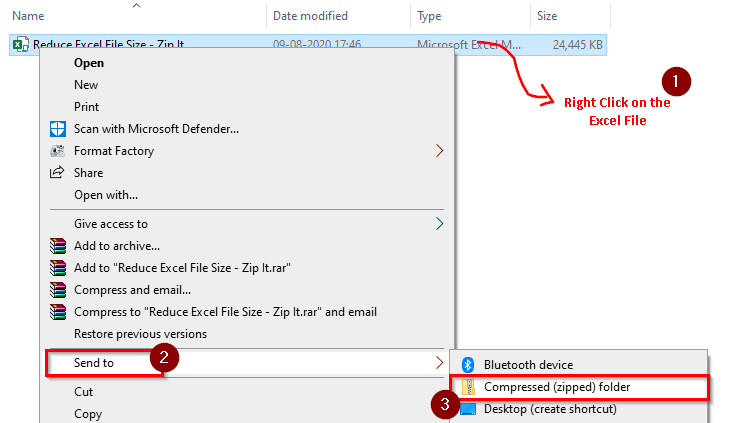
And that’s it. Using this technique there is a possibility to reduce the file size by around 10% to 20% without changing the original formatting. As you can see in the image below that an original file with file size as 24,445 KB has been reduced to 10,857 KB. This is nearly a 50% reduction in file size, which is not bad.

Now you can easily share the zipped file as an email attachment and the recipient can then unzip the file and get the original excel file for use.
9# Compress Images or Pictures in Excel
When you insert any picture or image in an excel worksheet, the size of the image gets added to the size of the worksheet making the excel file even larger and heavier.
One of the best ways to reduce the file size having pictures in it is by compressing the images outside the excel file using online image compressor tools and then inserting them in the excel worksheet.
Another way to reduce the size of image further is by following below steps:
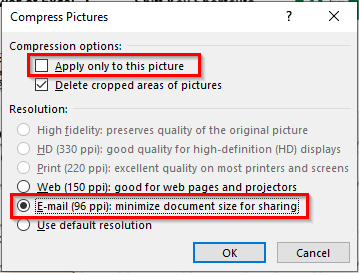
- Select any of the images in the excel worksheet and navigate to the following path – ‘Picture Format’ Tab > ‘Adjust’ Group > ‘Compress Pictures’ option.

- As a result, the ‘Compress Pictures’ dialog box would appear. Uncheck the checkbox – ‘Apply only to this Picture’ and select the radio button – ‘E-mail (96 ppi): minimize document size for sharing’, as shown in the image below:
- Finally, click on ‘OK’ and that’s it. Save the workbook and check the file size.
You would see drastic file size reduction without compromising on the quality of the image.

With this, we have covered mainly all the possible ways that you can use to compress or reduce the size of your excel file. I would happy to know if you have some more tips to compress the excel file size. Share it in the comment box below.

