Many a time, while working with huge excel data across multiple worksheets, you may sometimes need to merge and consolidate those data and bring them into a single master worksheet. May be your data are in different workbooks and you wish to merge those in some new workbook (like a master sheet). Doing it manually or by using some formula may turn out to be an ineffective way. Excel has provided a feature called Consolidate which can help us in achieving the desired objective. The Excel consolidate feature takes data from multiple worksheets, merges then, and then generates a summary.
Let us take one simple example to understand this functionality better.
Consolidate Feature Example
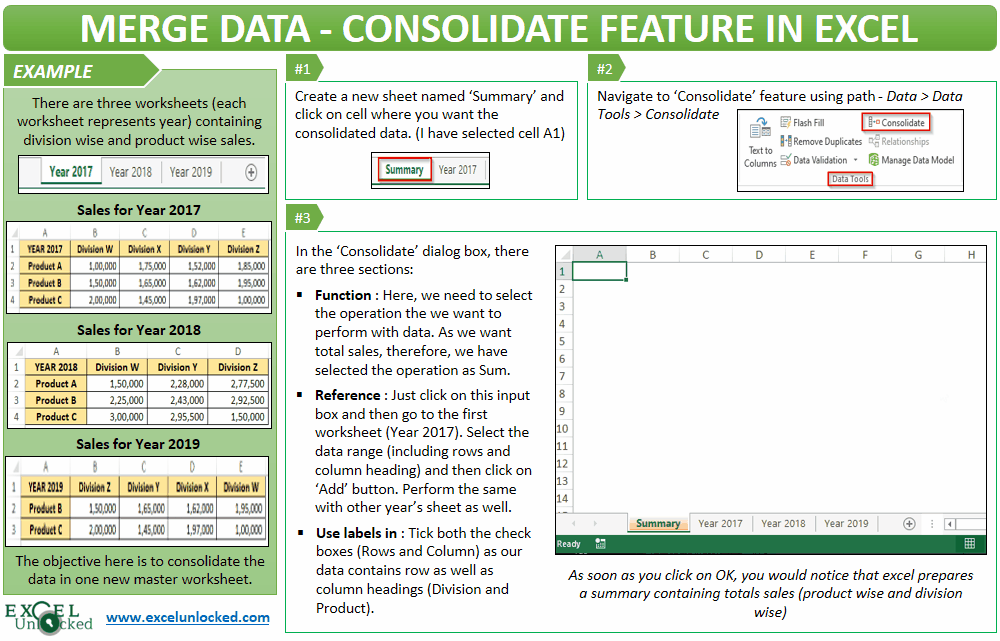
Suppose, you are a data analyst in an organization and your task is to perform a detailed analysis of sales of Products A, B, and C across three years of time for each of the four divisions W, X, Y, and Z. Each worksheet represents a year (2017, 2018, and 2019).

Refer to the below screenshots:


As you can see from the screenshot above, in 2018, Division X is missing as there were no sales in that year) and in 2019, the divisions and are in reverse order (First Division Z, then Division Y and so on) and product A row is missing.
The objective now is to prepare one master worksheet which shows the total sales during the three years, division and product-wise.
Also Read: Multiple Ways to Merge Columns in Excel
Manually doing the total of cells (with or without using formula) in each of the worksheets would not be an ideal way to merge the data. Also, there are chances of mistake because different years have different column and row headers.
The Excel Consolidate feature would be of great help to achieve the desired objective.
Concept of Excel Consolidate Feature
As mentioned in the introduction, the Excel consolidate feature takes data from multiple worksheets or multiple workbooks and summarises them into a master worksheet without any need for manual activity.
This feature is available from Excel 2007 and above versions.
Where to Find Consolidate Feature in Excel
Follow the below path to navigate to the ‘Consolidate’ feature in Excel.
‘Data’ Tab > ‘Data Tools’ Group > Consolidate

Consolidate Excel Data from Same Workbook
Firstly, you need to have a new blank worksheet where the consolidated data would be put. Insert a new worksheet in your workbook (Summary)

Then, go to the ‘Summary’ worksheet and click on the cell where you want to place the summary data (in my case, cell A1).
Then, navigate to the ‘Consolidate’ feature and click on the button ‘Consolidate’ to open the ‘Consolidate’ dialog box.
There are three main sections in this dialog box.
The first one is Function. This option tells excel the operation/function that you want to perform on the data. There are in total of eleven operations. As in the present case, we want the total of respective year’s sales, therefore, I have selected the ‘Sum’ function.
The second section is the Reference. This section helps us to select the reference to the cell(s) that you want to merge. To do this, click on the ‘Reference’ input field, and then click on the first sheet tab ‘Year 2017’. In there, select the entire data and then click on the button ‘Add’. Must include the headings (row as well as column).
Similarly, perform the above steps for other worksheets as well.
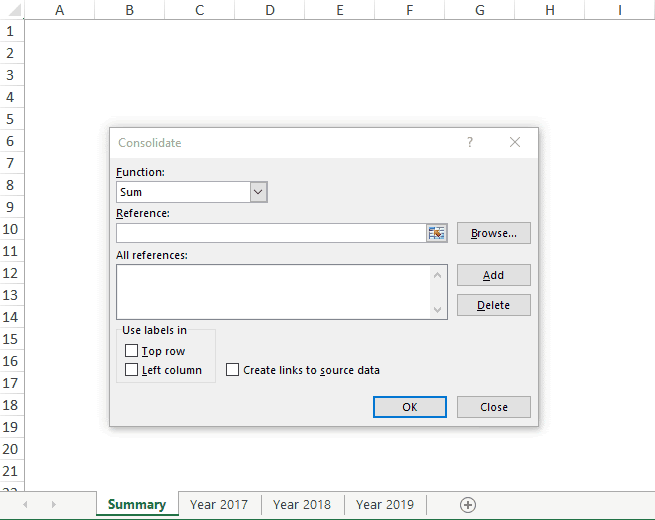
In the ‘All References’ section, you would notice the reference to the individual worksheets.
The third section is Use labels in. Here there are two checkboxes – ‘Top Row’ and ‘Left Column’. Since my data contains both the row as well as column headings, therefore, I need to check both these options. You shall tick according to your data arrangements.

If you want your summary data to update realtime for any changes made in the individual worksheets, then tick ‘Create links to source data’ checkbox.

Finally, click ‘OK’.
Consolidation Result
As a result, you would notice that excel consolidates and merges the data under appropriate heading rows and columns. Refer to the screenshot below:

Consolidate Data From Different Workbooks
To consolidate the data from different workbooks, it is mandatory to have the other workbook open. Rest all the steps remain the same.
Click on the Reference input box, and then go to that workbook and select the range of cells to consolidating.

Remove Data from Consolidate
To delete any cell range from consolidation, navigate to the ‘Consolidate’ option (under group Data’). Under the ‘All References’ section, click on the reference and then click on the ‘Delete’ button.
As a result, the deleted reference would not be considered for consolidation.

This brings us to the end of this blog. Share your views and comments in the comment section below. It would help us to improve and let you serve better.