The Excel Power Query feature has proved to be a life-saver when you want to get and transform data from various external sources. External sources can be any like some other excel workbook/file, or CSV, or Text (Notepad) file, and many more. Once extracted, the power query tool enables you to perform many transformations on the imported data. In this blog, we would learn one of the coolest utility of Power Query in Excel. We would unlock the technique to instantly and quickly combine or merge all or multiple text files in a particular folder to Excel.
The Excel Power Query feature is inbuilt in Excel 2016 and higher excel versions (Excel 2019 and Office 365). Fortunately, there is an external power query add-in available for the older excel versions 2010 (Professional Plus) and 2013. To get a power query for the older excel versions, check this link.
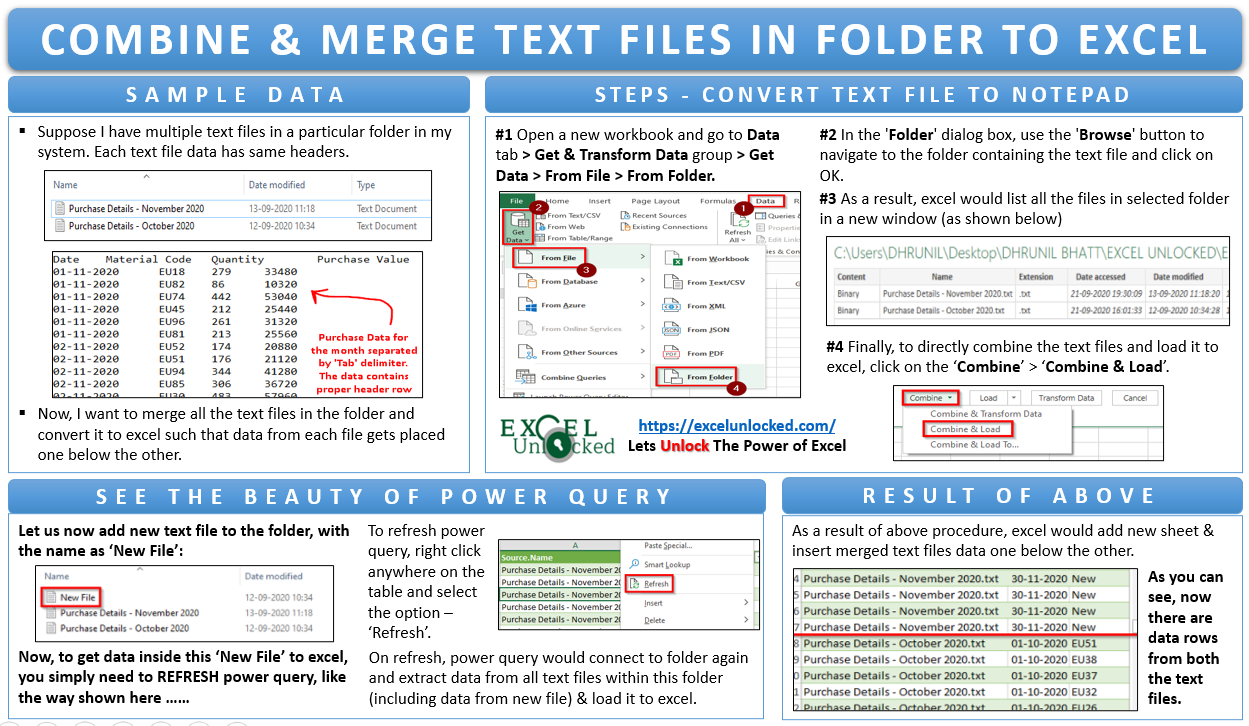
Sample Files – Combine Text (.txt) Files in Folder to Excel
Suppose I have multiple text files in a particular folder in my system where each text file contains the purchase or sales details for a month. All the text files have the same headers. See the image below.

Now, I want to combine and merge all these text or notepad files in this folder and convert it to excel such that data from each file is one below the other.
To copy and paste the data from the text file to excel manually is not a good solution. The excel power query feature would help you to quickly get data all files from a folder to excel.
Before you go through the steps, download the sample files (Click Download button below).
Why Use Power Query To Combine or Merge Text Files In Folder?
The power query feature is always preferred by excel experts because of following reasons.
- Firstly, the power query feature is a very user-friendly tool. You do not require any complex excel formulas creation skills or coding knowledge. Power Query does not use formula or codings.
- Secondly, while you use the power query to extract the files from the folder in Excel, it records and stores all the steps that you perform in the form of ‘Queries and Connections‘. Now, suppose there is some change in the source text file data. A simple refresh activity would help you to get the updated data from the text file to the excel file.
We would see in detail on the second point above with example in the upcoming sections of this blog.
Steps to Combine Data From Multiple Text Files to Excel
Follow undermentioned steps to merge multiple text files from folder to excel:
- Open a new workbook and go to Data tab > Get & Transform Data group > Get Data > From File > From Folder.

The above navigation path and image are from the excel version – “Excel Office 365“. It may look a bit different in other excel versions.
- In the ‘Folder’ dialog box that appears, use the ‘Browse’ button to navigate to the folder containing the text file to merge. Or you may directly paste the folder path in the input box. Finally, click on OK to continue.

- On clicking OK, excel would list all the files in the folder path (and also the sub-folders), as shown below:

- To combine the files and load it to excel, simply click on the ‘Combine’ button and select ‘Combine & Load’.

- In the ‘Preview’ dialog box that appears, simply click on the OK button.
- As a result, excel would insert a new worksheet and insert the merged text files data one below the other. See the image below:

As you can see from the above image, there are in total of 606 rows of data loaded to excel (which includes data rows from both the imported text files).
Now, let us add a new text file to the same folder. A file named ‘New File’ is added to the folder (see image below).

To get the updated data from folder in excel, simply right click on the data and select the option – ‘Refresh‘.

As soon as you click on the ‘Refresh’ option, the power query would connect to the folder path and extract the data from all the text files from that folder and load it to excel.

Let us now perform some transformation on this query.

Example of Transformation in Power Query
Now when we have completed with how to combine or merge text files in folder in Excel, let us go one step ahead.
The power query feature is not just limited to the extraction of data from external sources and importing it to excel. You can perform many other transformation steps on the extracted data and mold the data according to your need.
Let us perform following additional transformation steps to the extracted text files.
- Firstly, let us remove the extension text (.txt) from the file name.
- Next, we would add a new column at the last and get the purchase price per unit value in this column.
- Finally, move the first column (Source Name) to the end.
The transformation of the data is carried out in the ‘Power Query Editor‘ window. You can access the ‘Power Query Editor’ window using multiple ways. The most popular way is to navigate to the ‘Query’ tab > ‘Edit’ option (see image below).

Remove File Extension (.txt) from File Name in Power Query
To remove the extension of the file from the file name, select the table column containing file names. Then, navigate to ‘Home’ tab > ‘Transform’ group > ‘Replace Values’ option. This is similar to Ctrl + H keyboard shortcut in Excel.

In the ‘Replace Values’ dialog box, enter the text “.txt” in the ‘Value to Find’ field and keep the ‘Replace With’ section as blank. Finally, click OK as shown in the image below:

As a result, excel would remove the file extension “.txt” from all the values in the selected column.

Add New Custom Column At End and Get Purchase Price Per Unit
To add a custom column with purchase price per unit formula in power query, go to the ‘Add Column‘ tab > ‘General‘ group > ‘Custom Column‘ option.

In the ‘Custom Column’ dialog box that appears, give a name to this new column in the ‘New Column Name’ and then start giving the formula to get the Purchase Price per unit like demonstrated below:
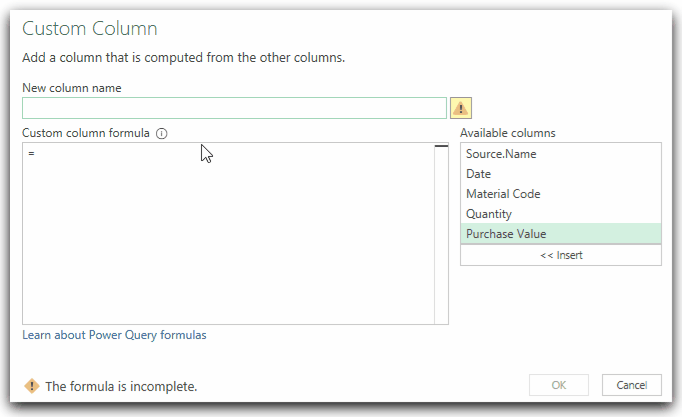
Once you complete with writing the formula the status would show as ‘No Syntax Errors have been Detected’, meaning the formula is perfect. Simply click on OK and check the Power Query Editor window. You would notice that it inserts a new column at the end with the header ‘Purchase Price Per Unit’. Also, the values in this column are calculated using the mentioned formula (i.e. Purchase Value / Quantity) for all the rows.

As you can see the data type for this new column is by default detected as ‘Any’. To change the data type, simply right click on the new column > Change Type > Decimal Number.

Move the Source Name Column to End in Power Query
To move the first column (Source Name) to last, one way is to simply select that column using a mouse and then, click and drag it to the end of the table.
Another method is to select the column and navigate to ‘Transform’ tab > ‘Any Column’ group > ‘Move’ > ‘To End’ option.

Or you can even right click on the column, and select the option ‘Move’ > ‘To End’.
All the above methods would take the first column of the table to the last in the Power Query Editor window.
Now, check the ‘Applied Steps’ section. You would notice that all the above three transformation steps would get added to the ‘Applied Steps’ section, in the same sequence in which they were performed.

Now, let us load the transformed data back to Excel. Go to the ‘Home’ tab and choose the option ‘Close & Load’ option. This would extract the transformed power query table to excel.

What if there is some change in the source file data or a new file is added to the folder or sub folder?
In that case, you simply need to need to do refresh the power query (Right Click > Refresh). On refresh, excel would re-perform all the applied steps in the same sequence (one after the other) to get the updated data to excel.
With this, we have completed this blog on how to merge or combine multiple text files to excel. We have also gone through some of the Power Query transformations on the imported data.